Account Registration
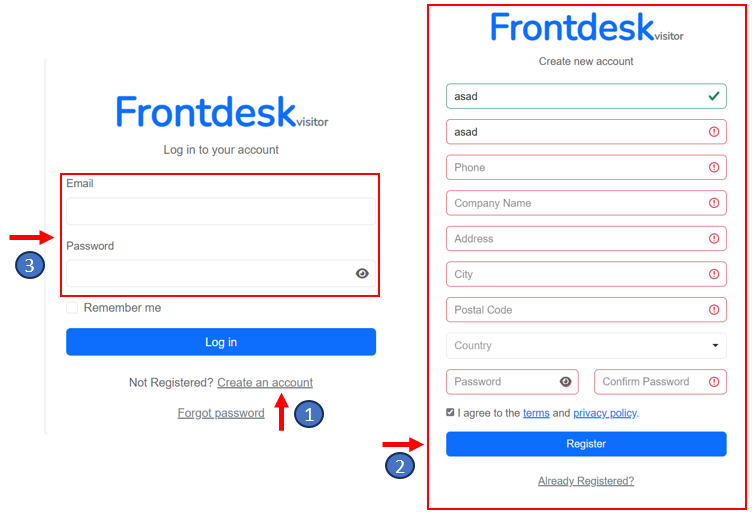
- To register and create an account, visit www.frontdeskvisitor.com and click on “Create an account”.
- Users should complete all mandatory fields highlighted within the registration form and acknowledge their agreement to the provided "terms and conditions." Upon ensuring all necessary information is provided, users should proceed to the "Register" button to submit their registration request for approval.
- Once account approval is granted, users can utilise their email and password credentials to log in to their accounts.
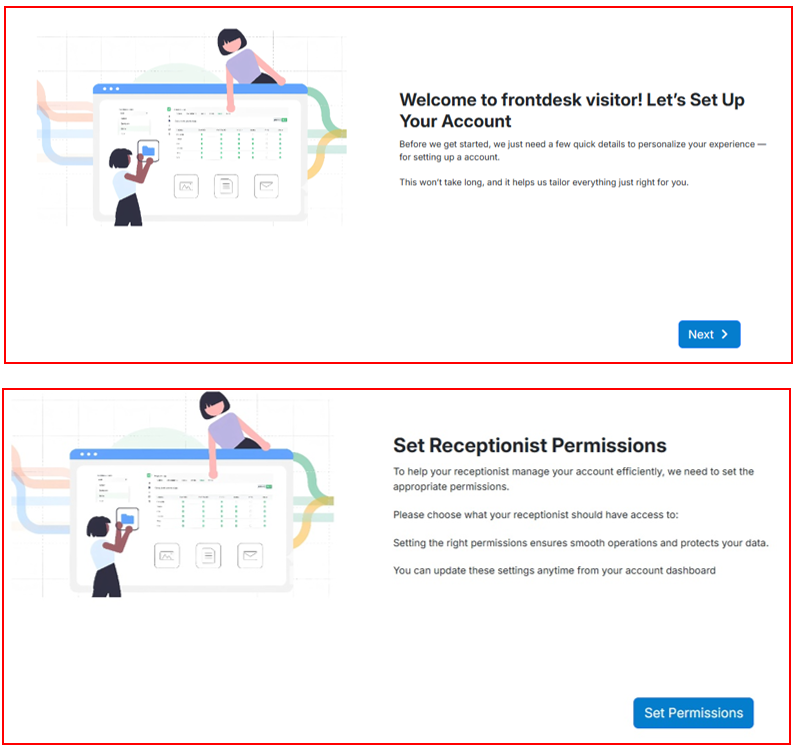
Next, the user should follow the setup wizard steps to complete the account’s initial requirements and finish onboarding.
Account Setup
Admin needs to go through this setup wizard before landing into dashboard page
Set User Permissions
At the beginning of the account setup wizard, the Admin must carefully configure the permissions for each user they create.
Why need permissions setting up:
- Defines exactly what each user can access and perform in the system. Protects sensitive information and ensures tasks are handled only by authorized staff.
- Places full responsibility on the Admin to balance convenience vs. security.
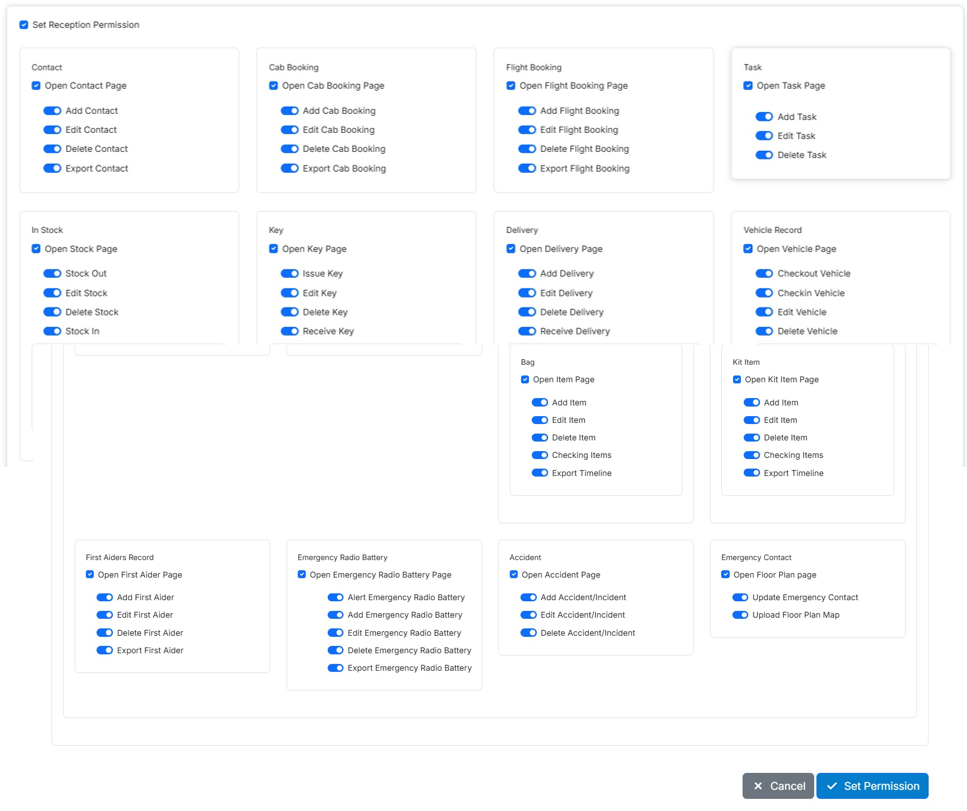
Setting Permissions
Open the Permissions module in the setup wizard.
Select the user role you are configuring (e.g., Reception, Security, Manager). For each feature/module (e.g., Visitors, Deliveries, Vehicles, Safety Logs):
- Review the available actions (Open Page, Add, Edit, Delete, Export). Decide which actions to enable for that role.
Apply the principle of least privilege: grant only the access required for daily duties. Save the permissions to finalize the user role
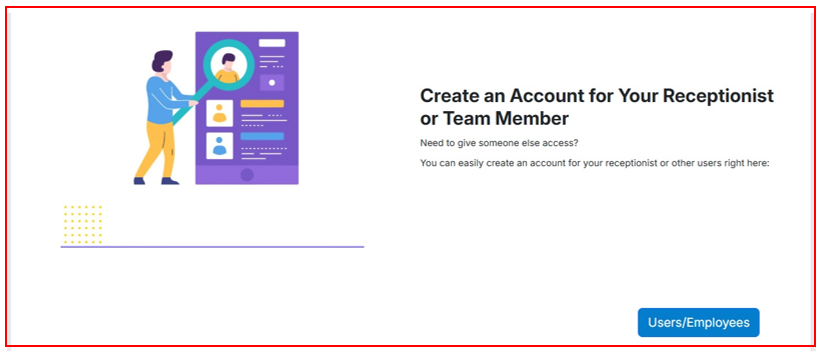
Create User Profiles
Once permissions are set, the Admin can begin creating user profiles such as Receptionists or any other role within the organization.
Creating user profile
- Click “Add User/Employee” to open the user creation form.
-
Enter Personal Information:
- Full Name
- Email Address (used for login)
- Phone Number
- Residential Address
-
Enter Employment Information:
- Designation (e.g., Receptionist, Security Officer, Manager)
- Role (assign the previously configured role/permissions)
- Joining Date
- Department/Branch (if applicable)
-
Set up Login Credentials:
- Ensure Status = Enabled
- Create a secure Password
- Save the profile to finalize account creation.

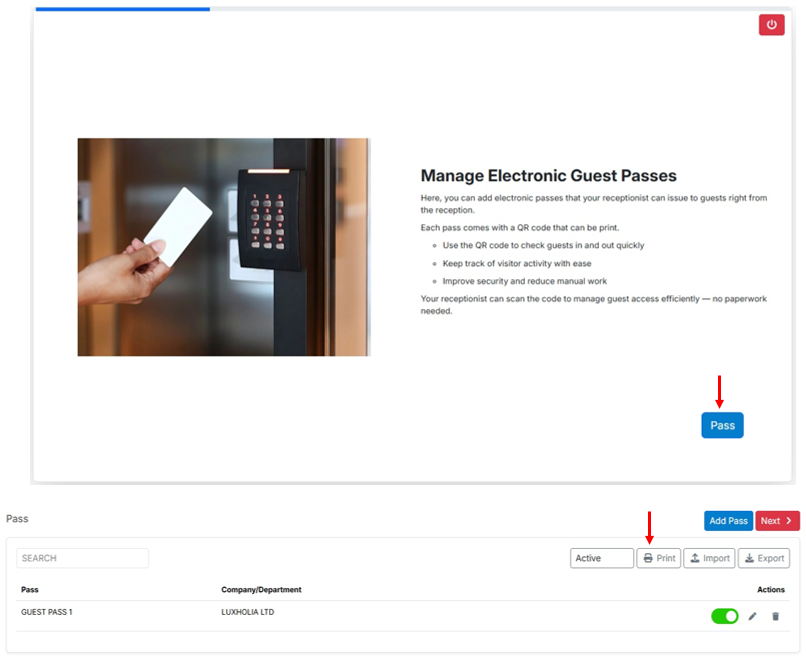
Pass
In this step, the Admin sets up passes that will be issued to guests, visitors, contractors, or engineers
Purpose:
- Provides a secure and efficient way to manage visitor and contractor access.
- Each pass is linked to the system, allowing check-in and check-out by barcode scanning.
- Improves accountability by tracking who is on-site, when, and for what purpose.
Steps for Admin (Setup):
- Click “Add Pass” to create a new record.
-
Enter the following details:
- Pass Type (e.g., Visitor, Guest, Contractor, Engineer). Company/Department (who the pass is issued to or associated with).
- Save the record. (The system will generate a unique barcode for the pass)
- Print and attach the barcode to the physical pass card or badge. Users can then scan the pass when checking in or out, ensuring accurate visitor logging.
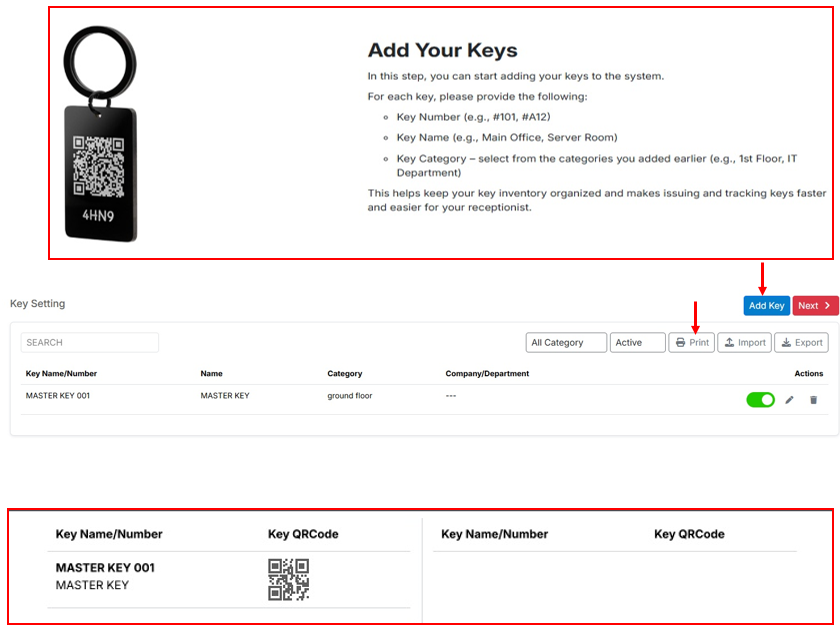
Add Your Keys
In this step, the Admin can register all physical keys used within the organization.
Steps for Admin (Setup):
- Click "Add Key" to create a new key record.
-
Enter the following details:
- Key Name (e.g., Main Gate, Office #12, Storage Room).
- Key Number (unique identifier engraved or assigned).
- Category (e.g., Office Keys, Vehicle Keys, Security Keys).
- Department the key belongs to
- Save the record. (The system will generate a unique barcode for the key)
- Print and attach the barcode securely to the physical key (laminated tag or keychain). Users can then scan the barcode when checking keys in or out, ensuring accurate tracking.
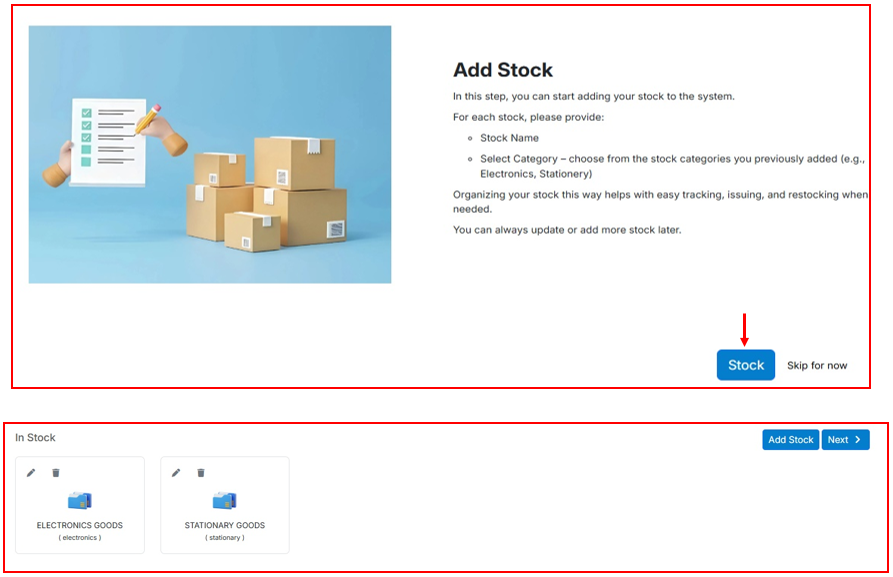
Add Stock
In this step, the Admin has the option to create records for stock items used within the organization.
Purpose:
- Helps maintain an organized inventory of supplies and assets (e.g., visitor badges, stationery, PPE, cleaning materials).
- Makes it easier to track usage, replenishment, and accountability.
- Provides visibility to Admins on what resources are available at any time.
Steps for Admin (Setup):
- Click "Stock" to create a new entry.
- (Optional) Create or select a Stock Category (e.g., Office Supplies, Safety Equipment, Visitor Materials).
- Enter the Stock Name (e.g., ID Badge, Printer Ink, First Aid Gloves).
- (Optional) Add details such as quantity, supplier, or notes.
- Save the record to add the item to your stock list.
- Repeat the process to add more stock items as required.
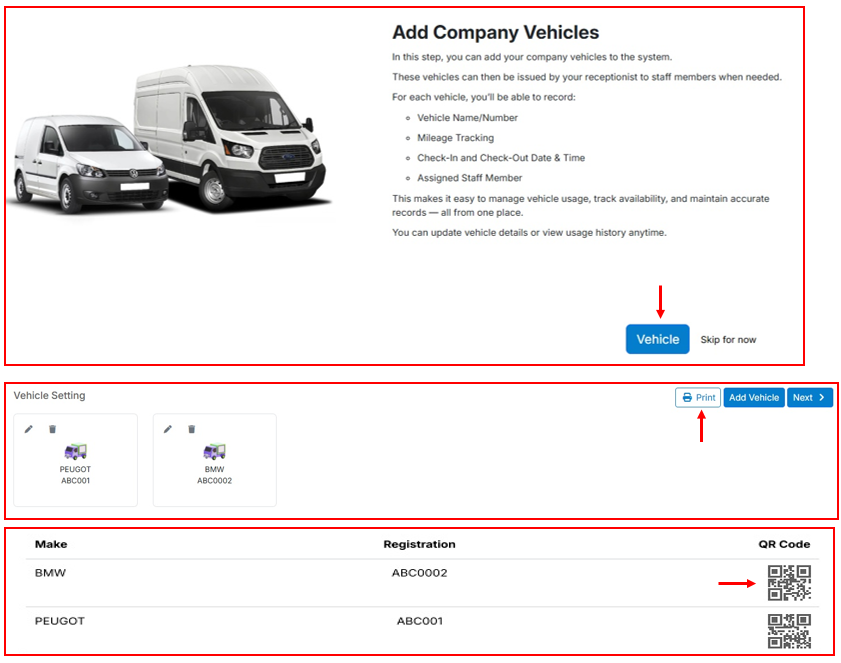
Add company vehicles
In this step, the Admin can register all company-owned vehicles into the system.
Purpose:
- Creates a centralized record of vehicles for tracking, security, and operational use.
- Enables easy check-in and check-out of vehicles by staff using barcode scanning.
- Helps prevent misuse, loss, or confusion of vehicle keys.
Steps for Admin (Setup):
- Click " Vehicle" to open the vehicle entry form.
-
Enter the following details:
- Make/Model of the vehicle (e.g., Ford Transit, Toyota Corolla)
- Registration number (license plate)
- (Optional) Assign to a department or category if required (e.g., Pool Car, Delivery Van)
- Once saved, the system will automatically generate a unique barcode for that vehicle.
- Print and attach the barcode to the vehicle’s key for quick identification.
Staff can then scan the barcode whenever checking the vehicle in or out, ensuring accurate logging.
Best Practice Checklist (Ongoing Use):
- Ensure all company vehicles are registered in the system, including spares or seasonal vehicles.
- Attach the generated barcode securely to the key (laminate or key tag for durability).
- Train staff to always scan keys when taking or returning vehicles.
- Regularly review vehicle logs to monitor usage, mileage, and accountability.
- Update or retire vehicle records when vehicles are sold, replaced, or decommissioned.
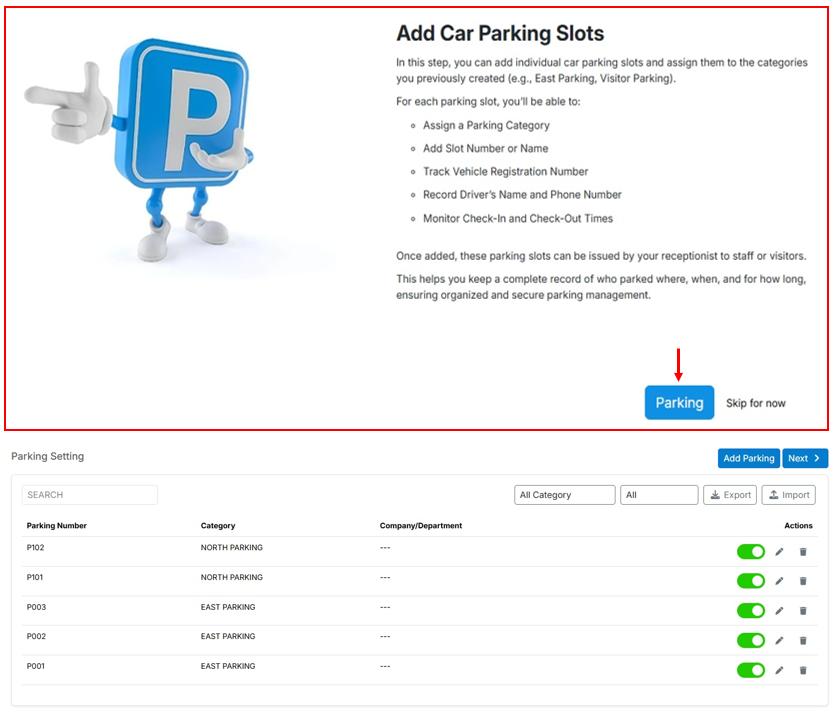
Add Car Parking Slots
In this step, the Admin sets up the car parking slots available within the premises.
Enables the system to manage parking allocation for staff, visitors, and company vehicles.
Ensures organized use of parking space, avoids conflicts, and improves security by tracking vehicle activity.
Provides visibility of available and occupied slots in real time.
Steps for Admin (Setup):
- Open the Car Parking Slot module in the setup wizard.
- Click "Parking" to create a new parking space record.
-
Enter details, such as:
- Parking Number, Category, Company/Department
- Save the slot record.
- Repeat the process until all parking slots are added to the system.
Best Practice Checklist (Ongoing Use):
- Clearly mark physical slots with signs or numbers to match system records.
- Regularly review allocation rules (e.g., visitor vs. staff) to optimize usage.
- Keep the system updated if slots are reassigned, added, or removed.
- Use reports to monitor usage patterns and identify underused or overcrowded zones.
- Reserve specific slots for emergency vehicles or accessibility needs.
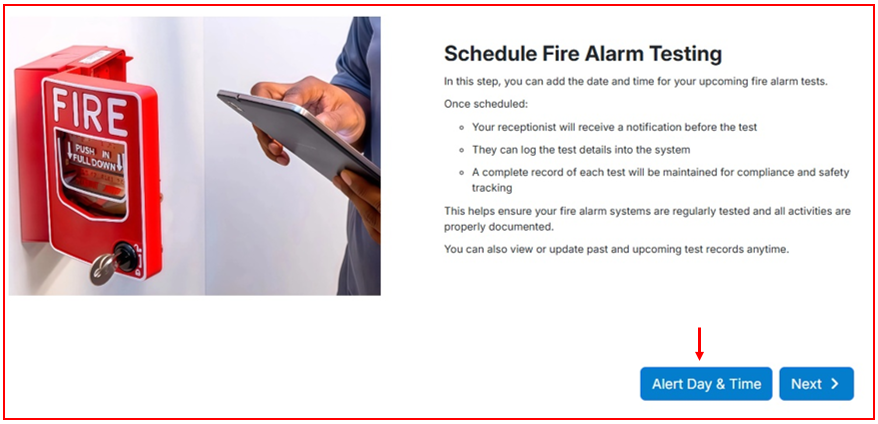
Schedule Fire Alarm Testing
In this step, the Admin configures the schedule for routine Fire Alarm system tests to ensure alarms are working correctly and meet safety standards.
Fire Alarms are critical for early detection and evacuation in emergencies.
Routine testing verifies that alarms are audible, functional, and trigger correctly across the building.
Keeping accurate logs demonstrates compliance with fire safety regulations and supports audits.
Steps for Admin (Setup):
- Open the Fire Alarm Testing module in the setup wizard.
- Set the frequency of testing (commonly weekly but adjust according to legal requirements and company policy).
- Assign responsibility to a staff member, safety officer, or facilities team to carry out the test.
- Save the schedule to activate recurring Fire Alarm tests.
Best Practice Checklist (Ongoing Use):
- Conduct tests at the same day and time each week (consistency helps staff recognize real vs. test alarms).
- Inform staff and occupants before testing to avoid confusion or panic.
- Activate alarms in different zones to ensure full system coverage.
- Record results immediately in the system (pass/fail, issues found).
- Escalate any faults for urgent maintenance.
- Retain all testing records for compliance audits and inspections.
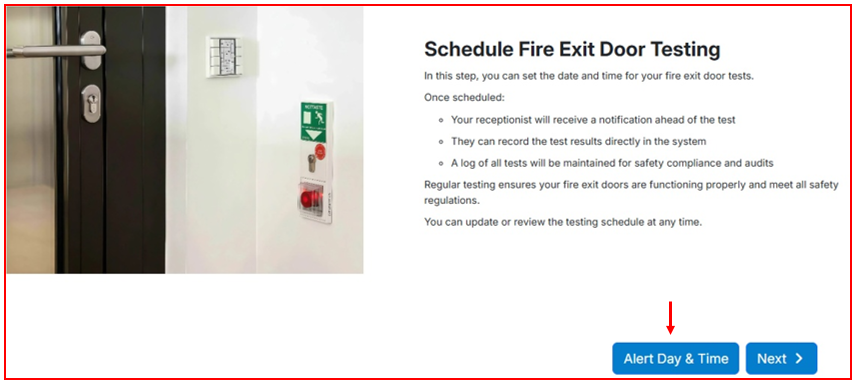
Schedule Fire Exit Door Testing
In this step, the Admin sets up the schedule for regular Fire Exit Door inspections to ensure that all emergency exits remain safe, functional, and compliant with regulations.
Purpose:
- Fire Exit Doors must be kept unobstructed, unlocked, and in good working order at all times.
- Regular testing ensures that doors can be opened quickly during emergencies, supporting a safe evacuation.
- Maintaining accurate records helps demonstrate compliance during audits or safety inspections.
Steps for Admin (Setup):
- Open the Fire Exit Door Testing module in the setup wizard.
- Define the testing frequency (e.g., weekly, monthly) according to your company policy and legal requirements.
Best Practice Checklist (Ongoing Use):
- Conduct inspections at the scheduled frequency without delay.
- Ensure doors are clear of obstacles, open smoothly, and signage is visible.
- Record findings in the system immediately after each check.
- Report and escalate any faults (locks, alarms, obstructions) for urgent repair.
- Keep inspection records for audit and compliance reviews.
- Review and adjust schedules if building layout or usage changes.
Manage Emergency Grab Bags
In this step, the Admin can register the locations of Emergency Grab Bags within the building.
Purpose:
- Emergency Grab Bags contain essential supplies (e.g., torches, radios, first aid, high-visibility vests, emergency contact lists).
- They are designed to be quickly collected and used during an evacuation or emergency.
- Recording their location ensures staff and emergency responders know exactly where to find them when every second counts.
Steps for Admin (Setup):
- Click "Add Emergency Grab Bag" to create a new record.
-
Enter the exact location (e.g., Security Office, Reception, Main Exit, Control Room).
(Optional) Add details such as:
- Responsible staff member or team
- Storage notes (e.g., "inside locked cabinet", "next to fire panel")
- Accessibility notes for responders
- Save the record.
- Repeat for each Emergency Grab Bag in the building until all are documented.
Best Practice Checklist (Ongoing Use):
- Assign ownership — allocate responsibility for each bag to a trained individual.
- Inspect quarterly — check that all critical supplies (radios, batteries, torches, PPE, first aid items) are present and in working condition.
- Replace expired items — swap out perishable or time-sensitive supplies such as batteries, first aid contents, or bottled water.
- Keep bags visible & accessible — avoid storing in locked or obstructed areas unless access keys are clearly assigned.
- Update records — if bags are moved or replaced, update their location in the system immediately.
- Run drills — periodically test staff knowledge by including grab bags in evacuation or fire drills.

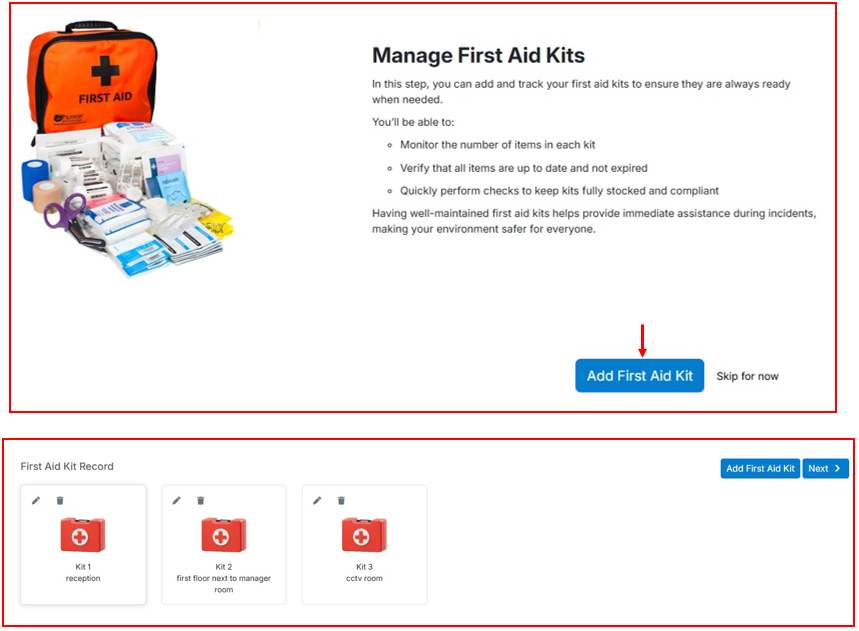
Manage First Aid Kits
In this step, the Admin registers the locations of all First Aid Kits in the building. This ensures quick access during emergencies and supports workplace health & safety compliance.
Steps for Admin (Setup):
- Click "Add First Aid Kit" to create a new record.
-
Enter the kit’s exact location (e.g., Reception Desk, Ground Floor Lobby, Kitchen, Warehouse).
(Optional) Add supporting details, such as:
- Responsible staff member or department
- Notes on accessibility (e.g., "inside wall cabinet" or "next to fire extinguisher")
- Save the record.
- Repeat the process for each First Aid Kit across your building until all are logged.
Best Practice Checklist (Ongoing Use):
- Assign responsibility — designate a staff member or safety officer for each kit.
- Inspect monthly — check contents for completeness and expiry dates.
- Record inspections — log dates and any replenishments directly in the system.
- Replenish immediately — replace missing or expired items without delay.
- Update system — if a kit is moved, replaced, or removed, update its entry so records remain accurate.
Add First Aiders
This step allows the Admin to add details of trained first aiders in the organization.
It is an optional step during account setup but is highly recommended for safety and compliance.
Steps for Admin (Setup):
- Click "Add First Aider".
- Enter the First Aider’s Name.
- Provide Contact Information (phone number or email).
- (Optional) Add their Position/Department and Certification Details (e.g., training date or expiry).
- Click Save to record the details.
- Repeat the process to add multiple first aiders, if available.
Notes:
- The list of first aiders can be updated later if staff receive new training or if certifications change.
- Keeping this information updated ensures that reception and emergency coordinators can quickly contact a trained responder when needed.
- This step helps improve emergency readiness and supports compliance with workplace health & safety regulations.

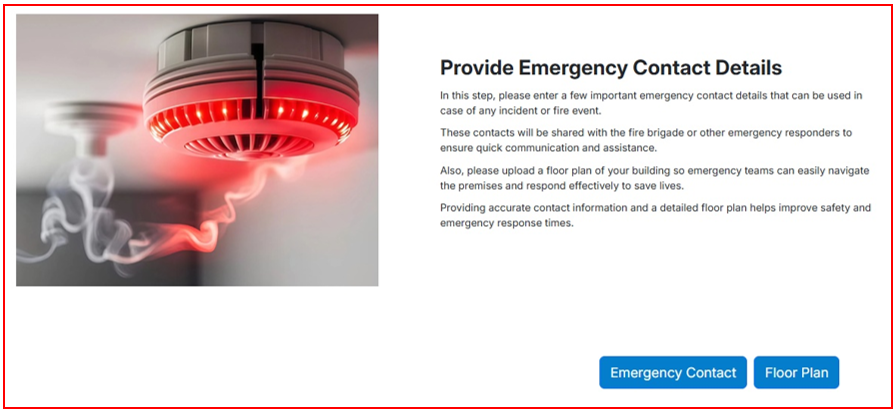
Emergency Contact & Floor Plan
In this step, the Admin must provide emergency contact details for key individuals who will take charge during an emergency.
These individuals may include security personnel, first aiders, managers, or event organizers.
You can enter details for up to four contacts, including their Name, Phone Number, and Position.
These contacts will be visible to emergency responders, helping ensure quick communication and response.
Additionally, the Admin has the option to upload a building floor plan or map.
This plan can be printed and shared with emergency services to guide them in navigating the premises quickly and safely.
Providing an up-to-date floor plan helps responders save time and protect lives during critical situations.
Backup Plans & Downloads
After completing the account setup, the Admin should prepare backup files for use during any service interruption.
Steps for Admin:
- Download backup files from the system.
- Print hard copies of all files.
- Distribute the printed forms to reception or relevant staff.
-
In the event of a system outage or server downtime, staff must:
- Record all visitor entries, deliveries, bookings, and tasks on the printed forms.
-
Once the system is back online:
- Transfer the recorded data from the backup forms into the application.
- Verify that all records are entered correctly and nothing is missed.
Note:
The backup files contain the same fields and tables as the web application, so staff can seamlessly move data back into the system once it’s available.
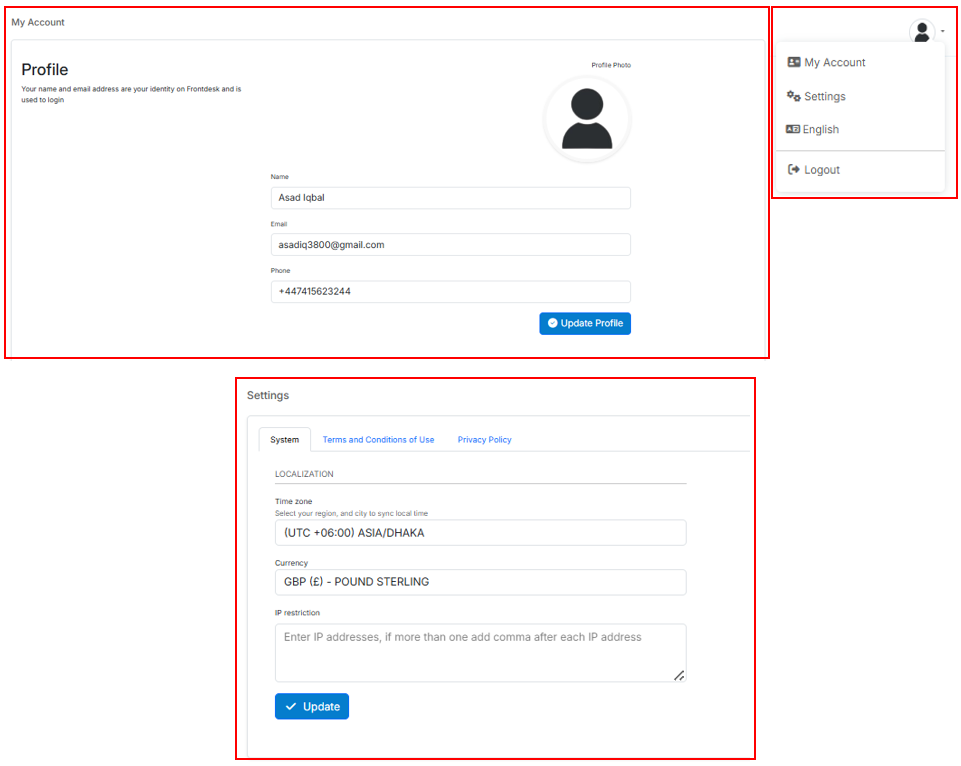
Profile and Account Settings
Accessing Your Profile
Users can access their personal profile by clicking on “My Account” in the menu on the right-hand side.
Within My Account, users can view and edit their personal details such as name, email, phone number, and other profile information.
System Settings
The Settings button allows users to configure system preferences, including:
- Time zone adjustment
- Currency selection
These settings personalize the system experience for each user.
Policies & Compliance
Inside Settings, users are required to review and agree to the platform’s:
- Privacy Policy
- Terms and Conditions of Use
Accepting these ensures compliance with legal and data protection standards.
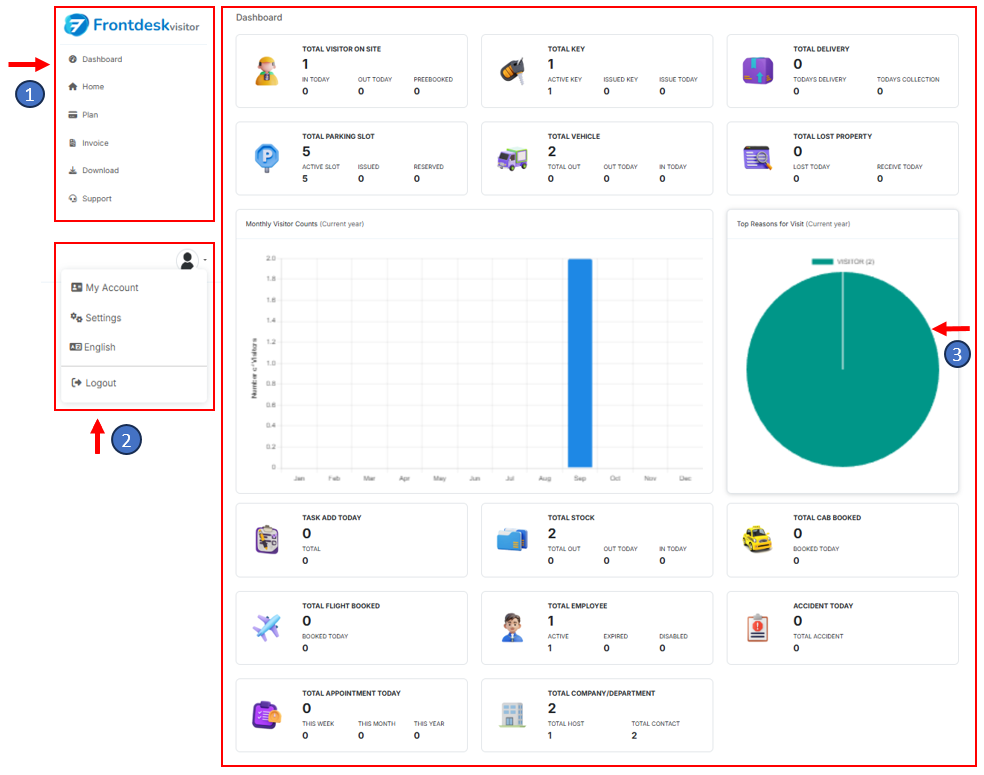
Navigating Dashboard
- On the left-hand side, users can access a variety of menu options for navigation.
- Located on the top right-hand side, users can conveniently access their account profile and its associated settings.
- The main view of the Dashboard presents a comprehensive display of matrices, graphs, and a pie chart.
On the dashboard user will have an overview of the following:
- Visitor Activity: Number of check-ins and check-outs, active visitors, pre-registered guests.
- Deliveries: Incoming and collected deliveries, pending items.
- Keys Management: Keys currently checked out, overdue returns.
- Vehicles & Parking: Checked-in/out vehicles, available slots, assigned categories.
- Health & Safety: Upcoming fire alarm/exit tests, first aid kit status, accident/incident reports.
- Lost Property: Recently logged items and their claim status.
- Stock Levels: Items low in quantity or recently issued.
- Notes & Tasks: Reminders, sticky notes, or handover tasks assigned to staff.
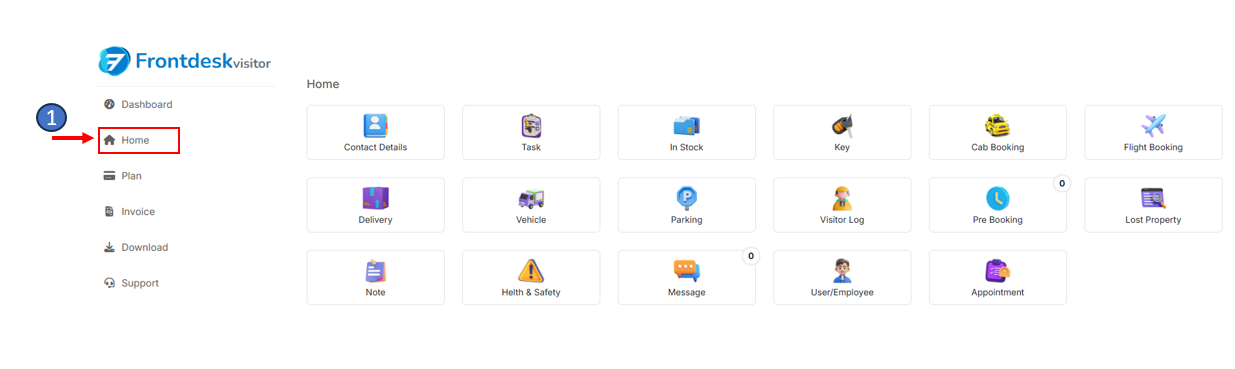
Home Menu
- Visitor Log – Track visitor check-ins, check-outs, pre-registrations, and badge printing.
- Delivery – Log, track, and record incoming and outgoing deliveries.
- Vehicles & Parking – Manage company vehicles and assign parking slots.
- Key – Issue, receive, and monitor physical keys with barcode tracking.
- In Stock – Maintain and monitor inventory of supplies and assets.
- Lost Property – Record, track, and return lost and found items.
- Note – Leave reminders, tasks, or handover notes for staff.
- Health & Safety Suite – Schedule and log safety checks (fire alarms, exits, first aid, incidents).
- First Aiders – Keep records of trained first aiders for emergency response.
- Emergency Grab Bags – Record and monitor the location and contents of emergency kits.
- Reports – Generate and export activity history across modules for audits and analysis.
- Project/Handover Sheets – Document tasks and ensure continuity during staff handovers.
- Cab & Flight Booking – Request and manage staff or visitor transport bookings.
FrontDeskVisitor.com – Full Feature List and their categorisation
Visitor & Access Management
Logistics & Facilities
Operations & Coordination
- Sticky Notes
- Appointment Booking
- Flight Booking
- Project Management
Health & Safety Suite
- Health & Safety Overview
- Fire Alarm Testing
- First Aid Kit Record
- Fire Exit Door Testing
- First Aiders Record
- Emergency Grab Bag
- Emergency Radio Battery
- Accident Form
- Fire Alarm
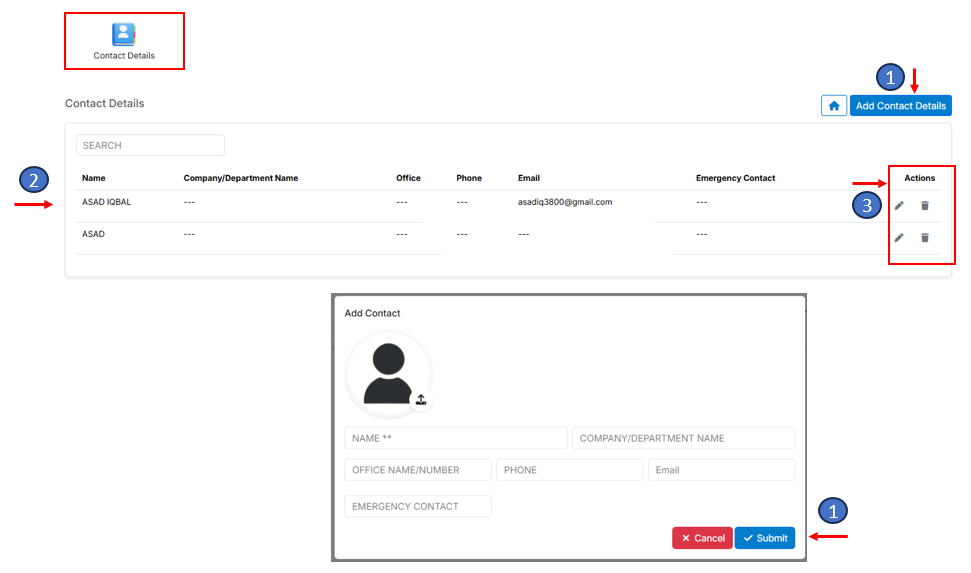
Home > Contact Details
Smart Directory Hub
Purpose
Serve as a central, searchable directory of all individuals involved in the system — guests, hosts, drivers, staff, service providers — making it easy to access and manage contact information without duplication.
How Contacts Are Added
| Entry Method | Trigger Point |
|---|---|
| Manual Add | User clicks "Add Contact Details" within the Contact Details module |
| Visitor Creation | Automatically saves new visitor data from the Visitor Management flow |
| Cab Booking | Driver and guest contact info captured during transport scheduling |
| Flight Booking | Guest, agent, or travel desk contact data stored during booking |
| Host Onboarding | Adds internal personnel contact during staff registration |
| Delivery & Logistics | Any entered contact linked to package or courier gets auto-added |
- To add a new contact select the "Add contact" button, users then need to input the necessary details in the popup window before finalizing the submission.
- Once submitted, the newly added user record will be prominently displayed in the main area.
- Users can conveniently amend this information using the options available in the Action field.
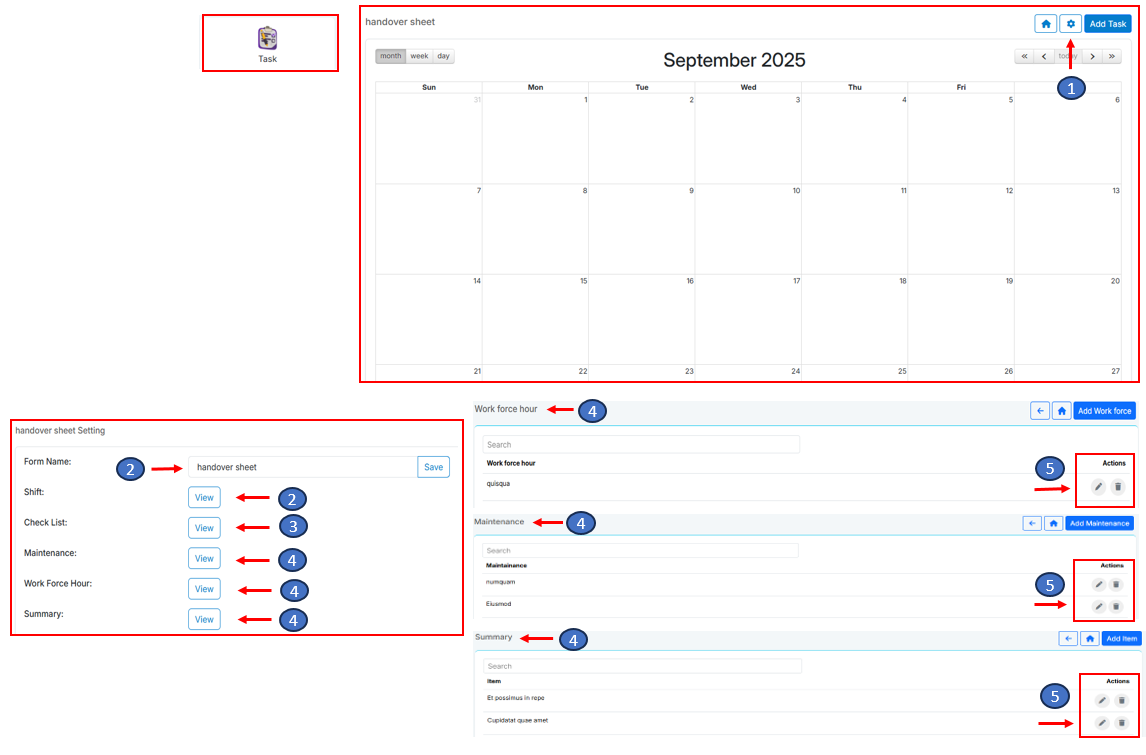
Home > Task
The Task feature enables users to accurately document daily job responsibilities. Forms can be created and fully customized to suit specific requirements, making them ideal for security personnel or engineers to record their daily workflows.
- From the setting button on the top right corner, users can create a form and add five distinct types of form elements to streamline their workflow.
- To initiate the process, users are prompted to input the "Name of the form" and subsequently save their entry. Following this, users proceed to specify the type of "shift" they are assigned, which may include day, night, or afternoon shifts.
- Once the shift type is identified, users can proceed to add items to the checklist, ensuring a comprehensive record of tasks and responsibilities. The form elements are fully customizable, allowing users to add as many fields as they require.
- Likewise, users have the ability to incorporate additional elements such as "Maintenance," "Task Work Force Hour," and "Task Summary" into their logs. This can be achieved by selecting the respective options and seamlessly integrating them into the log entry.
- Users are empowered to efficiently manage their entries by accessing the "Edit" or "Delete" functionalities available within the respective option windows. This enables users to seamlessly update or remove any items as needed, ensuring accuracy and relevance within their records.
Using the Task Form
Once the form and its elements are created, they are saved and ready to use at any time.
- To create a new task, click the "Add Task" button in the top-right corner.
- The customized task form will appear on the screen.
- Fill in all relevant details of the activity or workflow.
- Click Save to store the task.
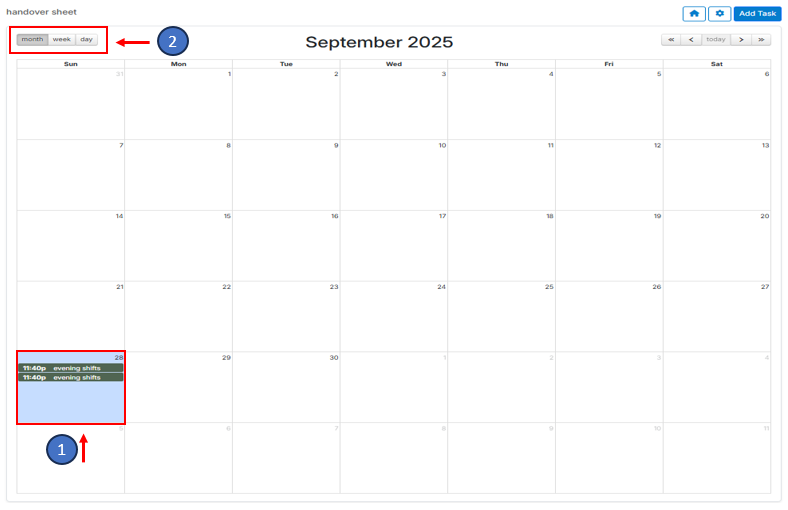
The saved task will automatically appear in the calendar view for easy tracking.
Tip: Users can return to the Tasks module at any time to review, update, or complete tasks.
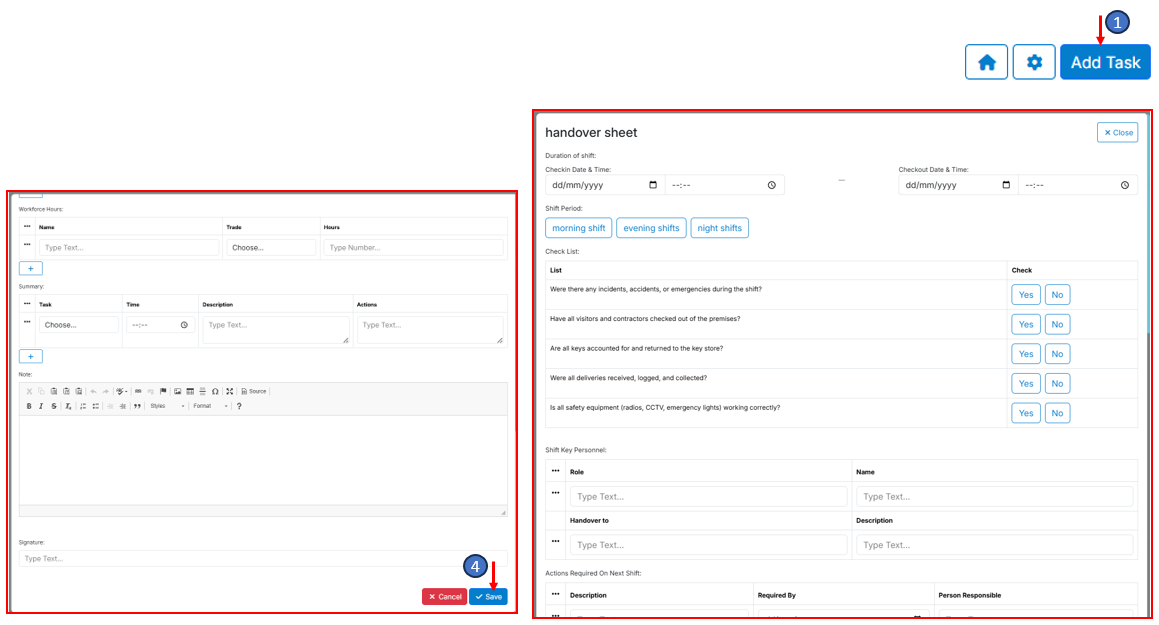
- Upon signing and saving the daily task, the task form will be added on the calendar for comprehensive organization.
- Within this calendar, users are presented with three distinct viewing options: Month, Week, and Day, allowing them to select the most suitable perspective for their operational needs.
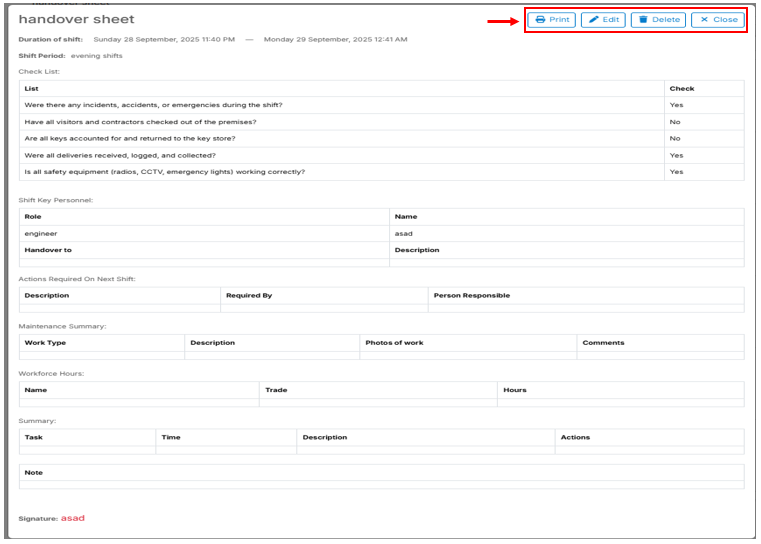
Upon clicking on the task added for a particular day, the " Handover sheet" form will open, which enables users to review and amend any details as needed. Additionally, users can easily generate printouts directly from this form for documentation purposes.
Home > In Stock
The In Stock feature helps administrators record and manage all stock items within the building. It provides a clear overview of available items, making it easy to track and update inventory at any time.
Step 1: Open the In Stock Section
- From the home menu, select In Stock.
- The Stock Streamline window will open.
- Click on the Settings icon at the top-right corner to open the main In Stock window.
Step 2: Create a New Stock
- Click the Add Stock button to create a new stock record.
- In the pop-up form, enter the stock name and category, then click Submit.
- The new stock will appear in the In Stock window.
Step 3: Add Items to the Stock
- Click on the newly created stock to open its details.
- Select Add Item, fill in the item information such as name, quantity, and notes, then click Submit.
- All added items will now appear in the stock list.
Step 4: Manage and Print Stock Items
- Use the options in the Action field to edit, delete, or update any stock items.
- A Print option is also available, allowing you to print barcode labels for each item.
- These barcodes can be attached to physical items for quick and easy scanning during future checks or updates.
- If needed, you can also clone, edit, or remove entire stock records to keep your inventory organised and accurate.
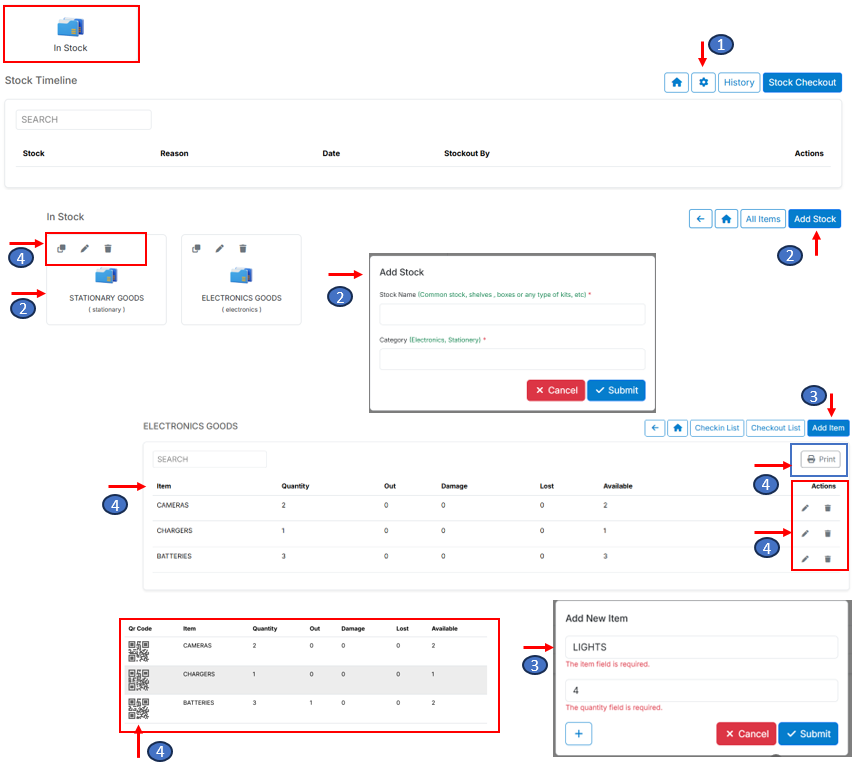
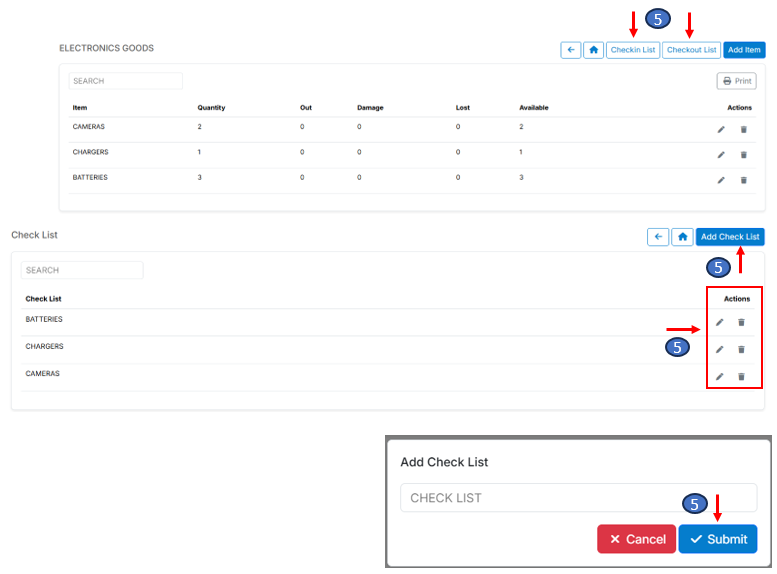
Step 5: Create Check-In and Check-Out Lists
- To manage the movement of items, click on the Add Check List button in the In Stock window.
- A pop-up form will appear where you can create a new list of items available for check-in and check-out.
- After entering the details, click Submit to save the list.
- This list can be viewed and managed using the options in the Action field.
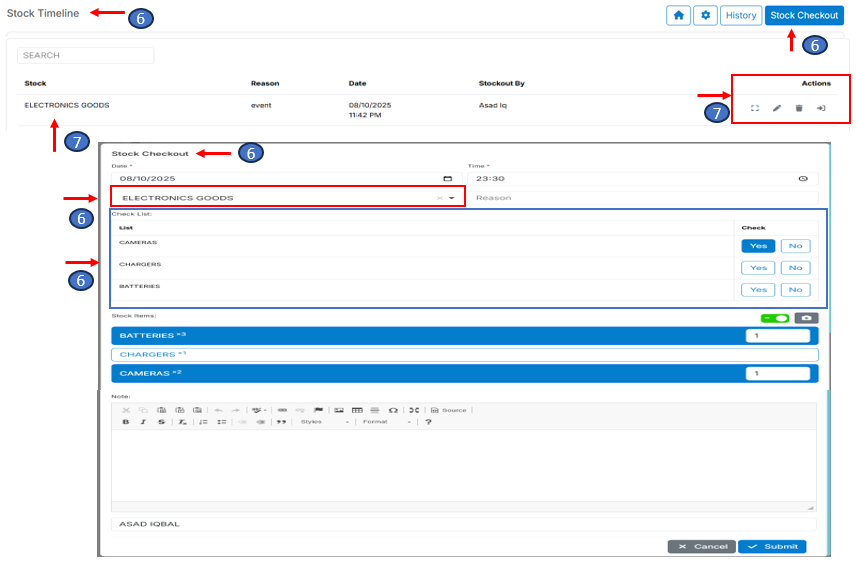
Step 6: Perform Stock Check-Out
- From the Stock Streamline window, click on the Stock Check-Out button.
- A form will appear displaying all available stock.
- Select the stock and the specific items you wish to check out, then click Submit.
- This process ensures accurate tracking of items being issued or used.
Step 7: View and Manage Checked-Out Stock
- Once submitted, a new record of the checked-out stock will be created and displayed in the Stock Streamline window.
- Use the options in the Action field to view, edit, or manage these records as needed.
- Admins can also monitor checked-out items to ensure timely returns or replenishment when required.
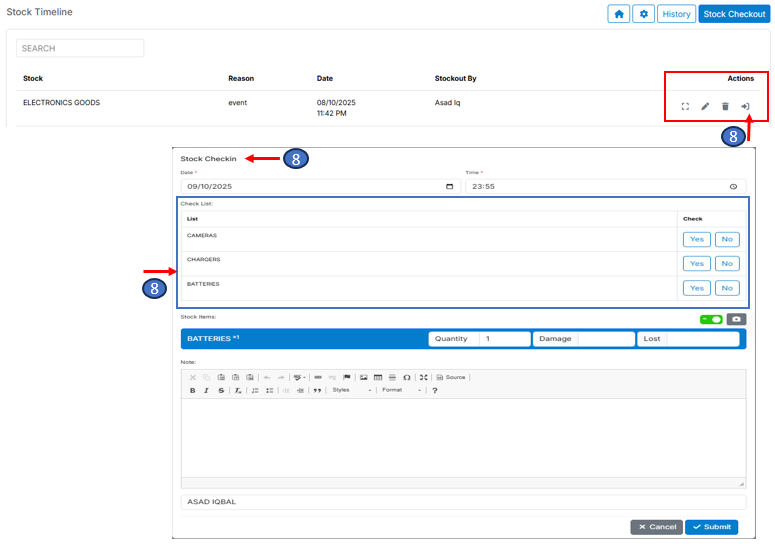
Step 8: Stock Check-In
- When items that were previously taken out are returned, the admin must record them through the Stock Check-In process.
- Click on the Stock Check-In button in the Action field.
- A check-in form will appear, showing the list of items issued and those being received back.
- Review and confirm the details carefully to ensure all returned items match the original checkout record, then click Submit to complete the check-in process.
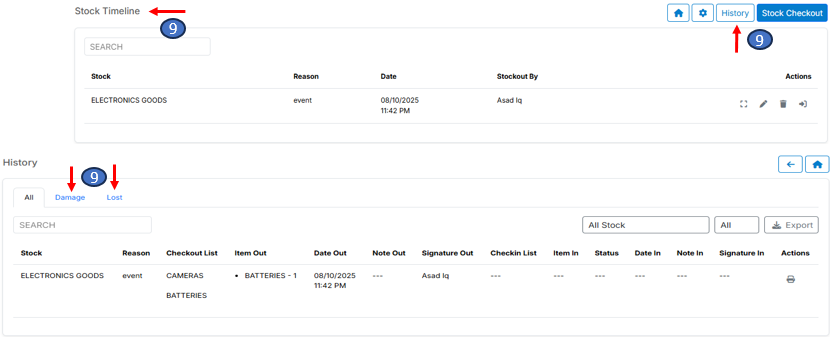
Step 9: View Stock History
A complete history is automatically created to record all activity within the In Stock feature, allowing for easy future tracking and audits.
- To access it, click on the History button in the Stock Streamline window.
- The History window displays a detailed log of all stock movements, including items that have been issued, returned, marked as lost, or reported as damaged.
- From this window, the admin can use the Search and Filter tools to quickly locate specific records.
- There is also an Export option available to download the data in Excel format for reporting or record-keeping purposes.
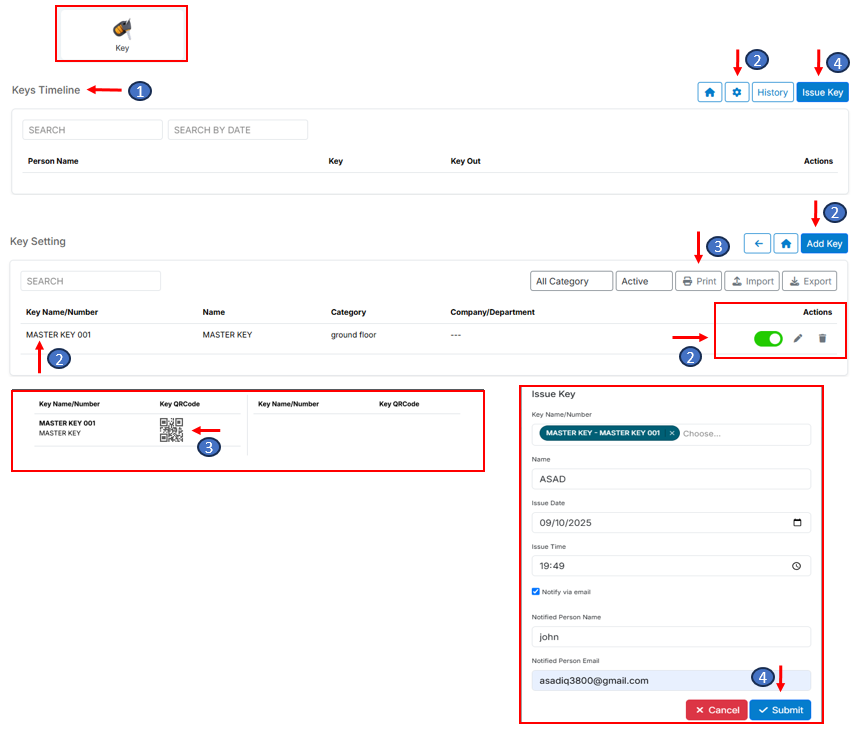
Home > Key
-
Open the Key Timeline
- From the Home screen, click Key. The Key Timeline window will open, showing current key activity in real time.
-
Configure Keys (Add, Edit, or Change Status)
- Click the Settings button (top right of the Key Timeline).
- Select Add Key to create a new entry.
- Fill out the short form with details like the key name/number, door or area, and any notes.
-
Click Save to add it to your list.
To manage existing keys:
- Use Edit to update details.
- Use Delete to remove a key (only when sure).
- Toggle Active/Inactive to temporarily control availability.
-
Print & Attach Barcodes (Recommended)
- In Key Settings, find the key and click Print (barcode).
- Print the label and attach it to the physical key.
- You can then scan the barcode using a scanner or compatible camera — this makes issuing and returning much faster and more accurate.
-
Issue a Key
Go back to the Key Timeline.
- Click Issue Key.
- (Optional) Scan the barcode to auto-fill the key details.
- Complete the form — include who’s receiving it, why, and when it should be returned.
- Tick Notify by Email to send automatic notifications.
- Click Submit — the new issue will appear on the timeline.
-
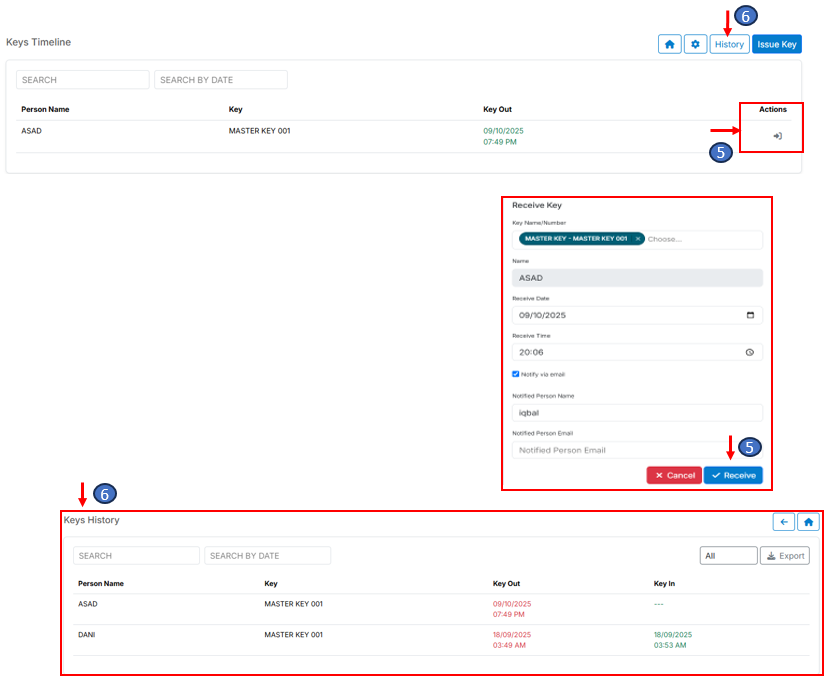
Receive (Return) a Key
- On the Key Timeline, click Receive Key.
- (Optional) Scan the barcode to quickly find the record.
- Fill in the return form (person returning, date/time, and notes).
- Tick Notify Person in Charge if you’d like to send a confirmation email.
- Click Submit — the return will appear in the timeline.
-
View History, Filter & Export
- Click History to view all key issues and returns.
- Use the filters (date, key, user, status) to narrow down results.
- Click Export to download the filtered data — great for audits and reporting.
-
Best Practices
- Use Active/Inactive instead of deleting keys you may reuse.
- Always attach barcodes for faster, error-free transactions.
- Set notifications so users and supervisors stay informed.
- Regularly review History + Export to monitor overdue or frequently used keys.
-
Troubleshooting
- Can’t scan? Check that your scanner is connected and allowed in your browser, or enter details manually.
- Key not available? Ensure it’s set to Active and not currently Issued.
- No notification emails? Double-check your notification settings and email addresses.
Home > Cab Booking
-
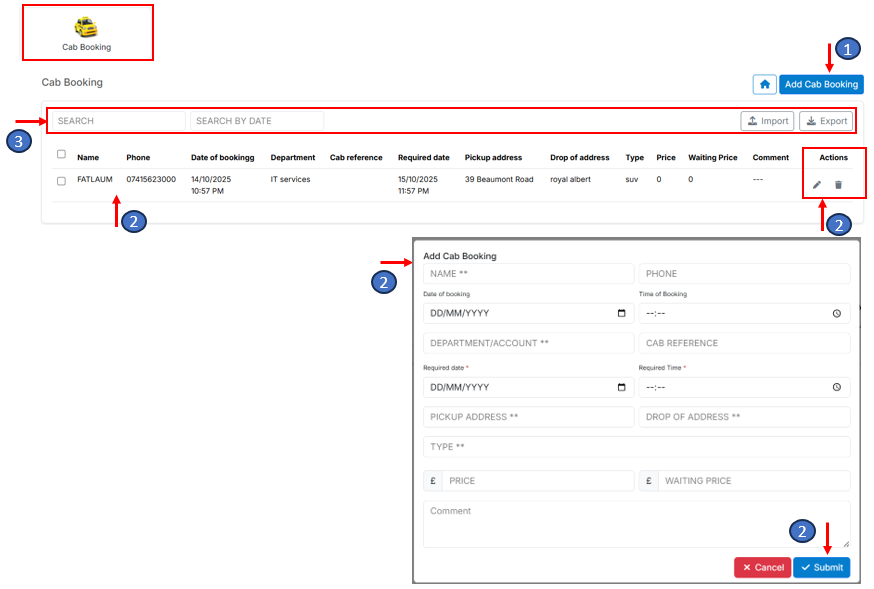
Add a New Booking
- From the Cab Booking page, click Add Cab Booking.
- A pop-up window will appear with a short form.
- Fill in all the required details — such as the pickup location, destination, date/time, and driver or passenger information.
- Once everything looks good, click Submit to save the booking.
-
View and Manage Bookings
- After submitting, your new cab booking will instantly appear in the list on the main Cab Booking window.
-
You can easily manage any record using the Action column:
- Click Edit to make changes.
- Click Delete to remove a booking (use with care).
-
Search, Export, or Import Records
- Use the Search box or filters to quickly find a specific booking — by date, driver, or passenger name.
- To save or share your data, click Export to download cab booking records.
- You can also Import booking files to upload multiple entries at once.
Home > Flight Booking
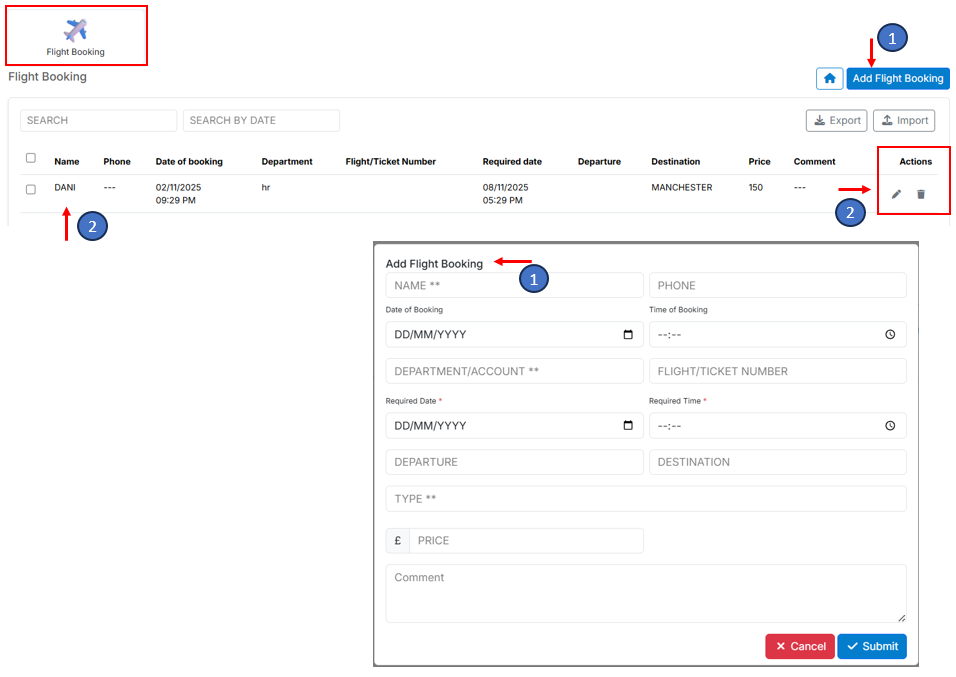
The Flight Booking feature allows administrators to record, track, and manage all flight arrangements made for staff or visitors. This helps keep travel information organised and easily accessible whenever needed.
Step 1: Create a New Flight Booking
- From the home menu, select Flight Booking.
- The Flight Booking window will open, displaying any existing flight records.
- To add a new booking, click on the Add Flight Booking button located at the top-right corner.
- A form will appear where you can enter all necessary flight details, such as passenger name, flight number, date, time, destination, and any additional notes.
- After verifying the information, click Submit to create the new record.
Step 2: Manage Existing Flight Records
- Once submitted, the new flight record will appear in the Flight Booking window.
- Use the options in the Action field to edit or delete a record whenever updates are required.
- The system also allows you to export and import flight records, making it easy to back up or update travel data as needed.
Home > Delivery
-
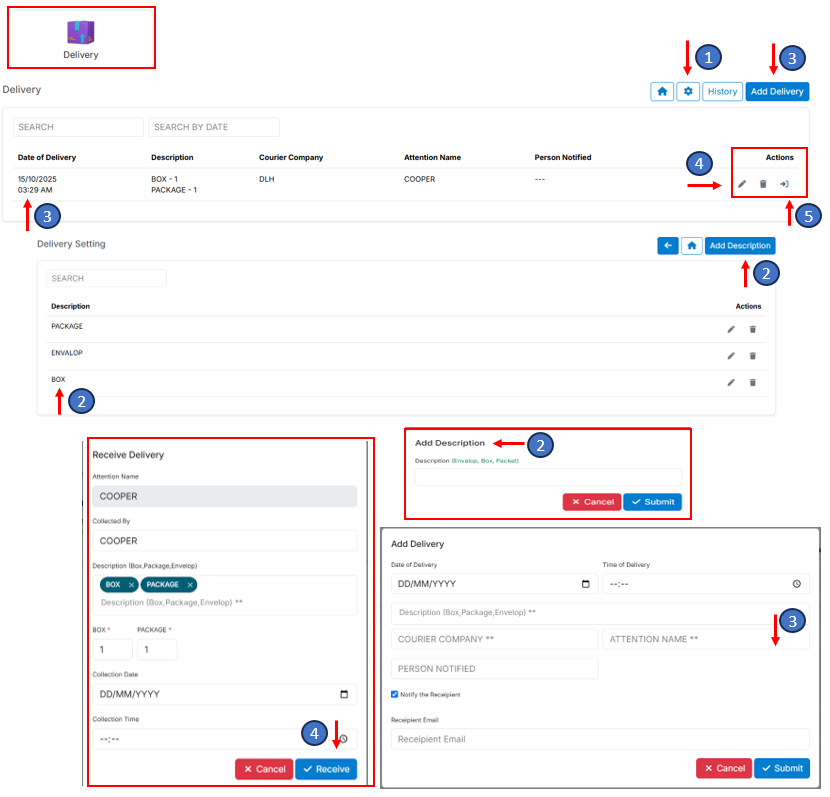
Open the Delivery screen
- From Home, click Delivery. The Delivery window opens with your current records.
-
Set up or choose a Description (once per type)
- Click Settings (top-right of the Delivery window).
- If you need a new description (e.g., "Parcel", "Registered Mail", "Courier – DHL"), click Add Description, enter the name, and hit Submit.
- If it already exists, just use the description from the list.
Tip: Keep descriptions short and consistent so your filters stay tidy.
-
Add a new delivery record
- Back on the Delivery window, click Add Delivery.
- In the pop-up form, fill in the details and click Submit.
- Your new record appears immediately in the Delivery list.
-
Manage an existing delivery
-
Use the Action column on any row to:
- Edit – update details if something changes.
- Delete – remove a record (use with care).
-
Use the Action column on any row to:
-
Hand over a package (Receive Delivery)
- When the package is collected by the person it belongs to, click Receive Delivery.
- In the pop-up, record the handover and hit Submit.
- The record updates to show the item has been received.
-
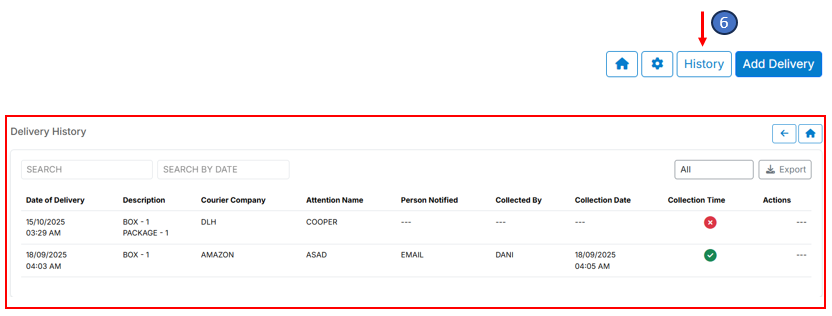
View history, search & export
- Click History to see all delivery activity (received and outstanding).
- Use Search/Filters (date, description, recipient, status) to find records fast.
- Click Export to download filtered results for reporting or audits.
- (If enabled) Use Import to bulk-upload delivery records.
Home > Vehicle
-
Open the Vehicle Timeline
From the Home menu, click Vehicle.
- The Vehicle Timeline window will open.
-
At the top right corner, you’ll see three options:
- Settings
- History
- Vehicle Checkout
- The main area shows all current records of vehicles that are checked out (or empty if none exist yet).
-
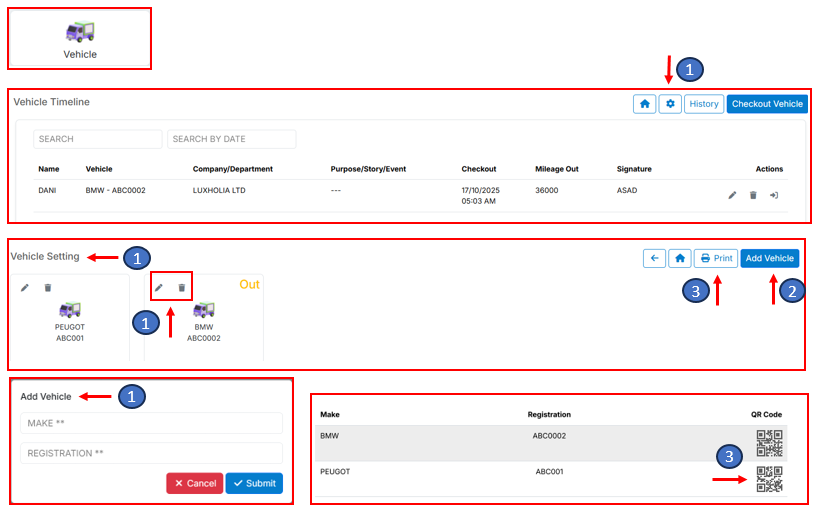
Add Company Vehicle Details (First-Time Setup)
If this is your first time using the Vehicle feature, you’ll need to add your company vehicles.
- Click Settings (top right of the Vehicle window).
- In the settings page, click Add Vehicle.
-
Enter the required details:
- Vehicle Registration Number
- Make and Model
- Once done, click Submit (or hit Enter).
- The new vehicle will appear in your list.
- You can edit or update these details anytime by using the options available beside each record.
Tip: Keep your list up to date whenever a new vehicle is added to or removed from the company fleet.
-
Print and Attach Barcode Labels (Recommended)
To make check-in and check-out faster, each vehicle can be assigned a unique barcode.
- In the Settings window, locate the vehicle you want to label.
- Click Print to generate and print the barcode.
- Attach the printed barcode label to the vehicle key.
This allows you to scan the key during check-in and check-out, saving time and reducing errors.
Note: Barcode scanning is optional but highly recommended for smooth and accurate tracking.
-
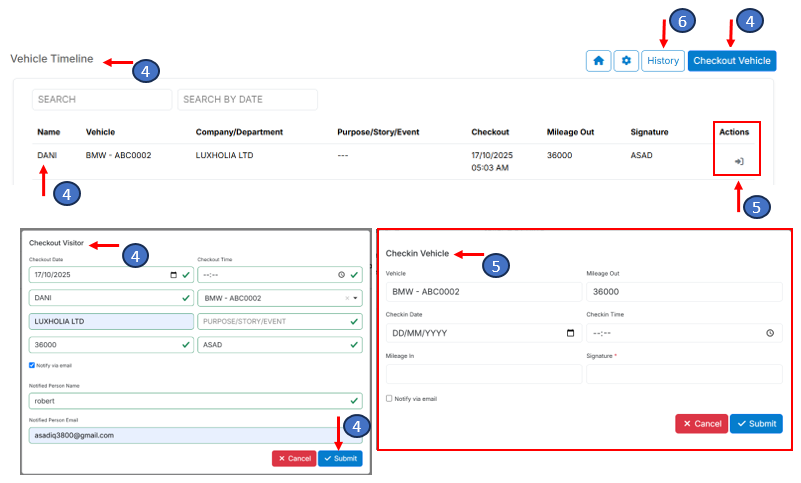
Check Out a Vehicle
When a staff member needs to use a company vehicle, follow these steps to check it out:
- From the Vehicle window, click Check Out Vehicle at the top right.
-
A pop-up form will appear — fill in all the required details, including:
- Vehicle name or registration
- Staff member’s name
- Purpose or destination
- Expected return date/time
If you’d like, tick the Email Notification option to automatically notify the relevant person (e.g., supervisor or fleet manager).
- Click Submit once all details are complete.
- A new vehicle check-out record will be created, and an "Out" status will appear next to that vehicle in the settings list.
Tip: You can also scan the vehicle key barcode to check out a vehicle instantly — no need to fill in the details manually.
-
Check In a Vehicle
When the vehicle is returned, it needs to be checked back in.
- Go to the Vehicle Timeline window.
- Find the record of the vehicle you want to check in, and click the Check In button beside it.
-
A pop-up form will appear — enter the return details such as:
- Date and time returned
- Returned by (staff member)
- Condition or notes (if needed)
- Click Submit to complete the process.
Once submitted, the record will disappear from the timeline, showing that the vehicle has been successfully checked in and is available again.
Tip: If you have barcode scanning enabled, you can simply scan the vehicle key barcode, and the system will automatically check the vehicle in — fast and hands-free.
-
View Vehicle History
The History section lets you review all vehicle check-in and check-out activity.
- From the Vehicle window, click History (top right).
- Here, you’ll see a full list of all past vehicle movements — both checked in and checked out.
-
Use the Search or Filter options to quickly find specific records by:
- Vehicle name or registration
- Staff member
- Click Export to download the filtered results as an Excel file for reports or audits.
Tip: Export your records regularly to keep a backup or share with your management team.

Home > Parking
How to Allot Parking
-
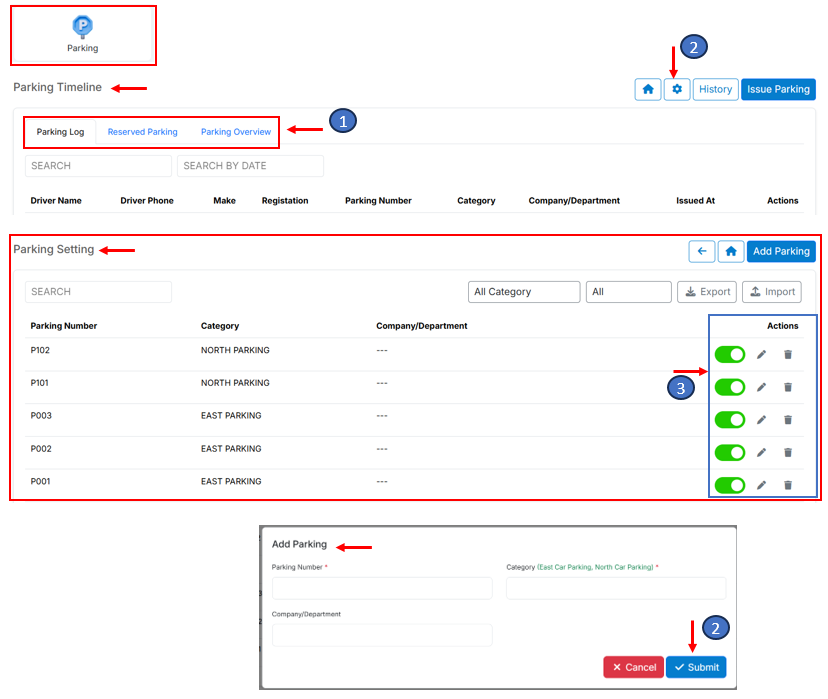
Open Parking & Explore the Timeline
- From Home, click Parking.
-
The Parking Timeline opens with three views:
- Parking Log – live activity of issued/returned spaces
- Reserve Parking – hold a space for a person/date
- Parking Overview – quick status of available vs. occupied
- On the right, you’ll see three actions: Settings, History, and Issue Parking.
-
Create a New Parking Space (Settings)
- Click Settings (top-right).
- You’ll see a list of all existing parking spaces with an Action column.
- Click Add Parking to create a new space.
- Fill in the required details (e.g., Space/Number, Company/Location/Zone, Category).
- Click Submit — your new parking space is added and appears in the Settings list.
-
Manage Spaces (Edit, Delete, or Empty an Issued Space)
-
In Settings, use the Action column on any row to:
- Edit – update details (name/zone/notes)
- Delete – remove a space (use with care)
Tip: Use Issue Parking from the Parking window to assign a space to a person, and History to review all past allocations with filters and export options.
-
In Settings, use the Action column on any row to:
-
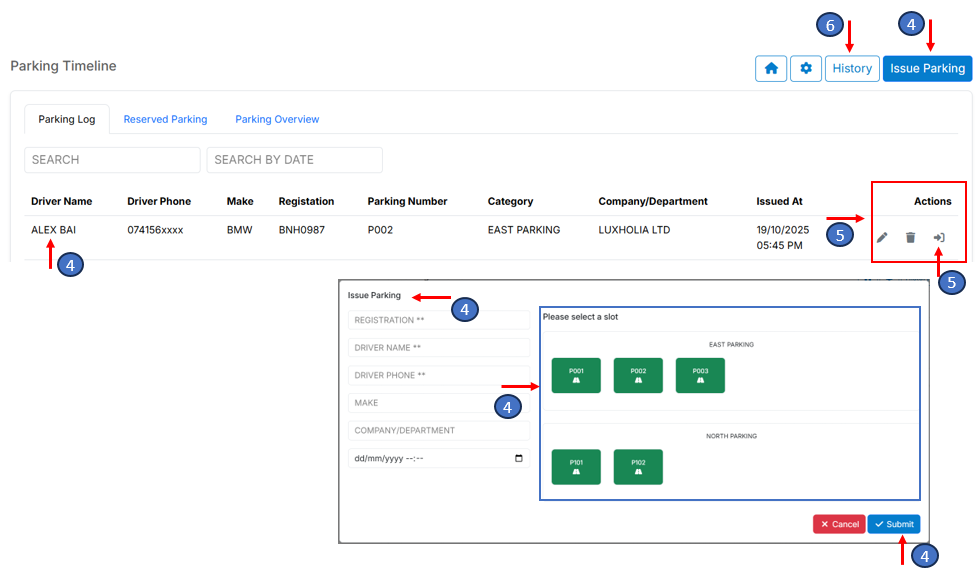
Issue a Parking Space
Once you’ve created your parking spaces, you can start assigning them.
- From the Parking Timeline window, click Issue Parking (top-right corner).
- A pop-up form will appear.
- Select the Parking Space you want to issue from the dropdown list.
-
Fill in the required details, such as:
- Registration
- Driver Name
- Make etc
- Click Submit to confirm.
- A new Issued Parking record will now appear in the Parking Timeline showing the assigned space and who it’s issued to.
Tip: Use this step to keep track of every parking space — who’s using it, when, and for how long.
-
Manage Issued Parking
You can easily make changes to issued parking spaces at any time.
- Go to the Parking Timeline window.
-
In the Action column beside each record, you’ll find options to:
- Edit – update details such as name, time, or duration.
- Delete – permanently remove a record (use with care).
- Empty / Release Space – when a parking spot becomes available again, click the Empty icon (next to Delete).
Once you release a parking space, its entry will disappear from the main timeline, and the action will be recorded automatically in the History section.
This keeps your Parking Timeline clean and up to date with only active records.
-
Issue a Parking Space
Once you’ve created your parking spaces, you can start assigning them.
- From the Parking Timeline window, click Issue Parking (top-right corner).
- A pop-up form will appear.
- Select the Parking Space you want to issue from the dropdown list.
-
Fill in the required details, such as:
- Registration
- Driver Name
- Make etc
- Click Submit to confirm.
- A new Issued Parking record will now appear in the Parking Timeline showing the assigned space and who it’s issued to.
Tip: Use this step to keep track of every parking space — who’s using it, when, and for how long.
-
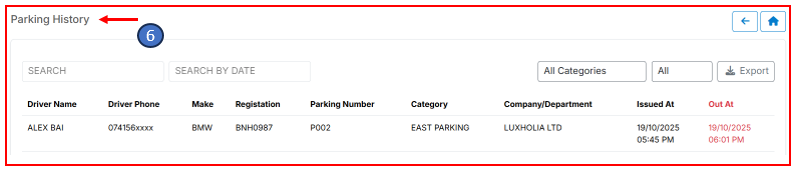
View Parking History
All past parking activities — both issued and released — are stored in the History section.
- Click History at the top-right of the Parking Timeline window.
- You’ll see a complete list of all previous parking records.
-
Use the Search and Filter options to find specific information, such as:
- A particular vehicle or user
- Date range
- Parking status or type
- Click Export to download your filtered results as an Excel file for reports or audits.
Tip: Regularly review your parking history to track usage patterns, optimise space allocation, and maintain clear records for management or security purposes.
Home > Pre Booking
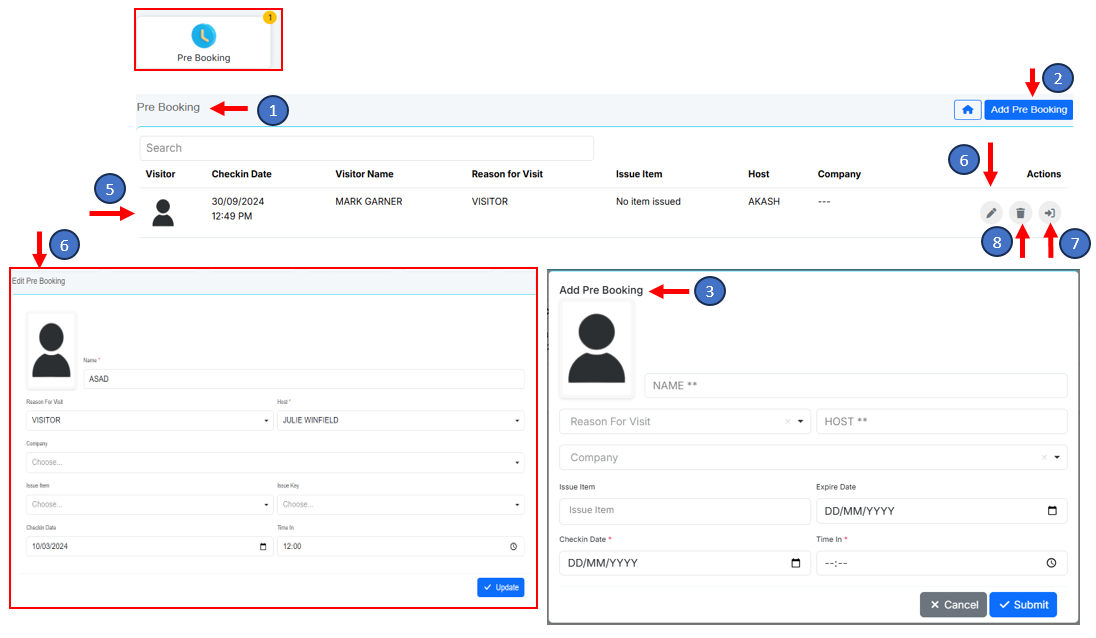
- In the View Log, the user can pre-book a guest from the "Pre Booking" section.
- Access the "Add Pre Booking" button located at the top right corner of the interface to initiate the pre-booking process. Upon selection, the corresponding form will be displayed on the screen, ready for data input.
- Populate the visitor’s details within the provided popup menu, ensuring to fill in all required fields highlighted in red. Once the necessary information is provided, proceed by clicking the "Submit" button to finalize the pre-booking request.
- In the "Pre booking", a counter displays the number of pre booked guests in the system for easy contact and approach reason.
- Upon submission of the pre-booking form, a new record will be seamlessly integrated into the pre-booking page, visible for reference.
- For editing pre-bookings, users can click on the "Edit" button in the "Actions" field, make the requisite modifications, and then confirm the changes by clicking the "Update" button.
To check-in pre-booked guests:
- When the guest arrives, simply click on the "Check-In" button, relocating the respective record from the pre-booking page to the Home page.
- To remove a pre-booking, users can click on the "Delete" button, effectively canceling the pre-booked reservation.
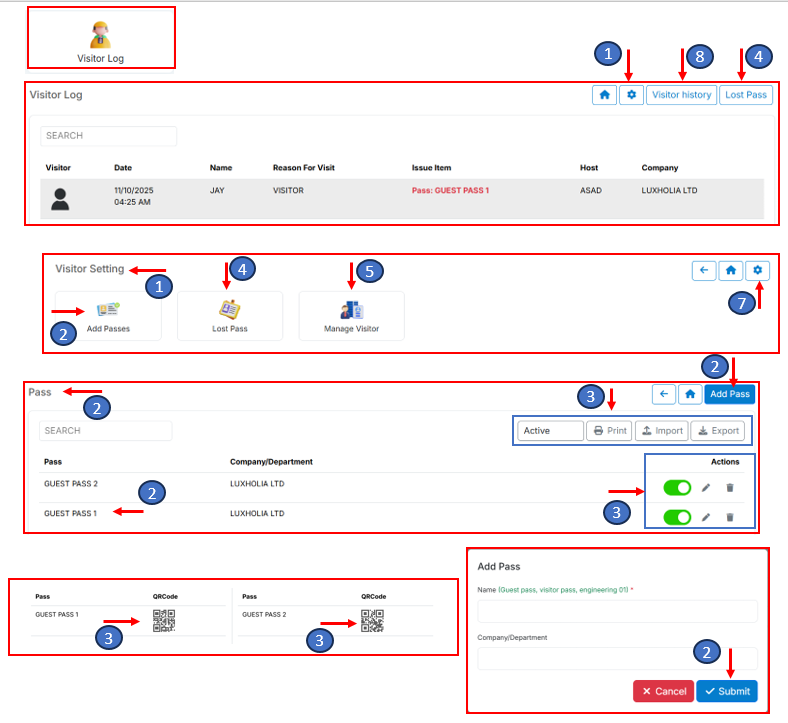
Home > Visitor Log
-
Open the Visitor Log
- From the Home menu, click Visitor Log.
- The Visitor Log window will open, showing a list of all current visitors on-site.
-
From this screen, you can:
- View active visitors.
- Check visitor History.
- Manage visitor Settings.
For new accounts:
Before you can start logging visitors, you’ll need to set up your passes and visitor settings.
- Click Settings (top-right corner).
-
From here, you can:
- Add Passes
- Manage Lost Passes
- Manage Visitors
-
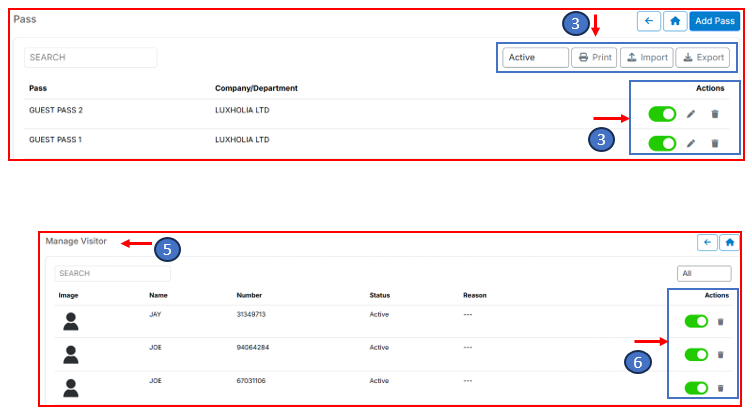
Add a New Pass
- Inside the Settings window, click Add Pass.
- The Pass Management window will open.
- Click Add Pass again to create a new pass.
-
Fill in the required details, such as:
- Pass Name or Number
- Company/Department
- Once completed, click Submit.
- A new pass record will be created and appear in the Pass List in the pass window.
Tip: Setting up passes first helps ensure smooth visitor check-in and reduces confusion later on.
-
Manage Pass Information
After adding passes, you can easily manage and update them from the Pass List.
-
In the Action column, you’ll find several options:
- Toggle Active/Inactive – enable or disable a pass without deleting it.
- Edit – update pass details if needed.
- Delete – permanently remove a pass (use carefully).
- Print – generate and print a barcode label to stick on the physical pass for quick scanning.
- You can also Export or Import pass details in Excel format, making it simple to back up or bulk update your pass data.
Tip: Keep your pass list clean and organised — deactivate old or lost passes instead of deleting them to maintain a full record.
-
In the Action column, you’ll find several options:
-
View and Manage Lost Passes
- In the Visitor Settings window, you’ll find a section for Lost Passes.
- Lost passes are usually reported and added by your reception or front desk team when a visitor misplaces their pass.
- These records will automatically appear in the admin panel, allowing you to view and manage them centrally.
- From here, you can review lost pass details, mark them as replaced, or remove them from the list once resolved.
Tip: Regularly monitor lost passes to maintain an accurate pass inventory and prevent unauthorised use.
-
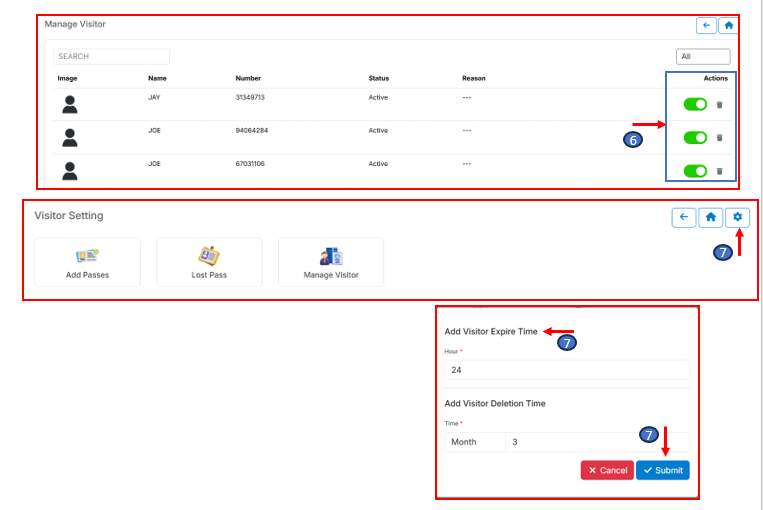
Manage Visitors
- To view and manage visitors currently on your premises:
- Go to the Visitor Settings window.
- Click Manage Visitors — this opens the Visitor Management window.
- Here, you can see a live list of all visitors who are currently checked in to the site.
- Each entry shows important details such as the visitor’s name, company, host, and check-in time.
- This gives admins a complete overview of who is on-site at any given moment.
Tip: Use this section to verify visitor activity, ensure safety compliance, and track visitor movement during busy hours.
-
Manage Visitor Status
- Inside the Visitor Management window, each visitor record includes an Action column that lets you control visitor access easily.
- Toggle Active/Inactive – Use this to mark a visitor as active (on-site) or inactive (checked out or no longer on-site).
- Delete – Remove a visitor record permanently, for example, if it was entered by mistake.
Tip: It’s best practice to toggle visitors to Inactive rather than delete them — this keeps your visitor history complete and ensures accurate reporting later on.
-
Set Visitor Expiry Time
You can choose to set an expiry time for visitor records if you’d like the system to automatically mark them as inactive after a certain period.
- In the Visitor Settings window, click the Settings button (top-right corner).
- Enter the number of days and hours you want visitor records to remain active.
- Click Submit to save your changes.
Once set, the system will automatically expire visitor entries after the selected time period.
Note: This setting is optional — you can leave it blank if you prefer to manage visitor activity manually.
-
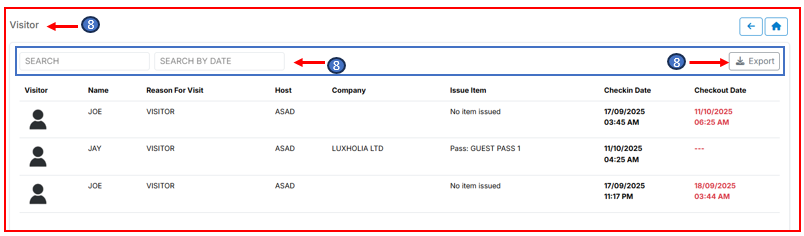
View Visitor History
- The Visitor History section allows you to view and manage all past visitor records.
- From the Visitor Log window, click Visitor History.
- A complete list of all visitor check-ins and check-outs will appear.
-
Use the Search and Filter options to quickly find specific records by:
- Visitor name
- Company or host
- Date range
- Pass type or status
- Click Export to download the filtered results as an Excel file.
This is useful for audits, reporting, or maintaining digital backups of visitor activity.
Tip: Regularly export visitor data to keep a secure record of site access and compliance documentation.
-
View Visitor History
- The Visitor History section allows you to view and manage all past visitor records.
- From the Visitor Log window, click Visitor History.
- A complete list of all visitor check-ins and check-outs will appear.
-
Use the Search and Filter options to quickly find specific records by:
- Visitor name
- Company or host
- Date range
- Pass type or status
- Click Export to download the filtered results as an Excel file.
This is useful for audits, reporting, or maintaining digital backups of visitor activity.
Tip: Regularly export visitor data to keep a secure record of site access and compliance documentation.
Home > Lost Property
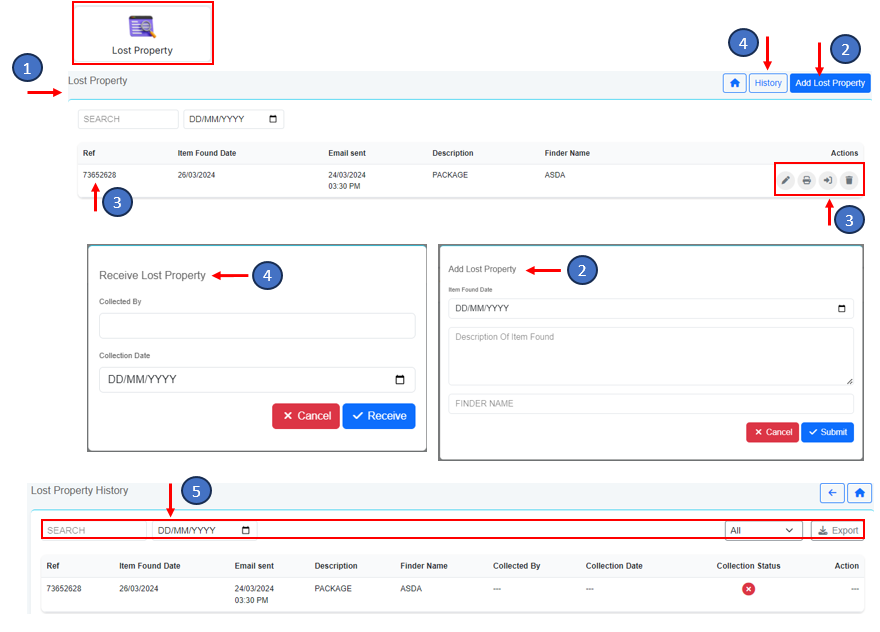
- The lost property section offers users access to lost property configurations.
- To add a new lost property item, select the "Add Lost Property" button in the Lost Property window. In the subsequent window, input the item’s data and click the "Submit" button.
-
To manage lost property items within the system, users can utilize the options available in the "Action" field to:
- Edit item details
- Delete obsolete entries
- Mark items as received
- There is also a "Receive Lost Property" option available to users to add the details when the relevant person receives the lost items.
-
In the lost property, users can also view and filter the detailed history of all the Lost property items, to access the history users must click the History button.
Additionally, users have the option to filter out results using various search criteria, and they can also export their search history for downloading and printing purposes.
Home > Note
Notes are akin to delicate whispers captured on paper, fluttering like delicate petals in the gentle breeze of memory.
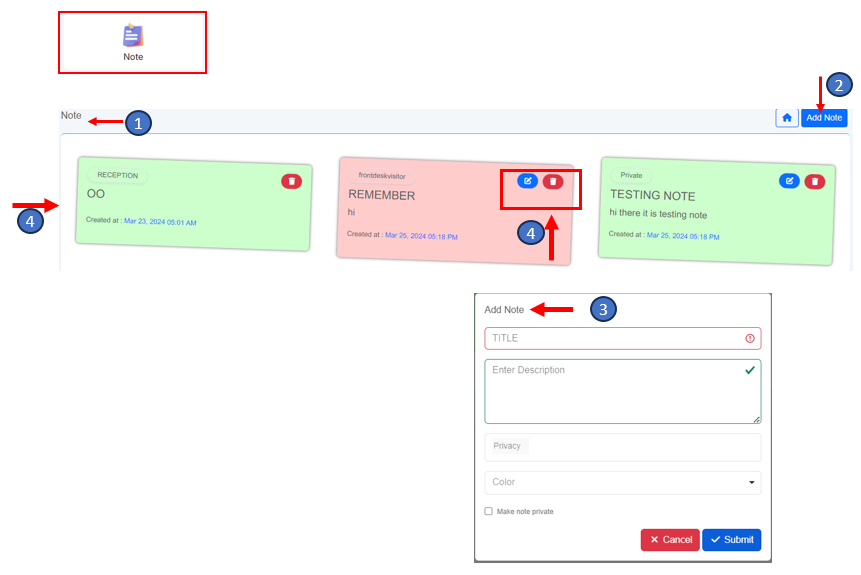
- Access the realm of notes by selecting "Notes," unveiling a window where users can peruse notes contributed by various individuals.
- Initiate the creation of fresh notes with a simple click on the "Add Note" button.
- Interact with the "Add Note" window, diligently providing essential details including Title, Description, and other relevant options before finalizing the process by clicking on the "Submit" button.
- After submission, the newly created note seamlessly integrates into the "Note" page window. Users can "Edit" or "Delete" these Notes as necessary.
Note: Users can make Notes public for every user to view or keep them private for their sole usage.
Home > Health & Safety
The Health & Safety section brings together all safety-related features within FrontDeskVisitor, allowing administrators to manage compliance records, perform regular safety checks, and keep emergency information up to date in one central place.
This section is designed to help organisations maintain a safe working environment and ensure that all safety requirements are properly documented and accessible when needed. From scheduling fire alarm tests to recording first aid inspections, every activity can be tracked and managed digitally, removing the need for paper-based logs.
Within the Health & Safety menu, administrators can access the following features:
- Fire Alarm Testing – Schedule and record routine alarm checks.
- Fire Exit Door Testing – Ensure all emergency exits are working correctly and accessible.
- First Aid Kit Record – Keep detailed records of first aid kits, their contents, and inspection dates.
- First Aiders Record – Maintain a list of trained first aiders and their contact details.
- Emergency Grab Bag – Track the contents, location, and inspection history of emergency kits.
- Emergency Radio Battery – Record and monitor battery checks for all emergency communication devices.
- Accident Form – Document any workplace incidents or injuries for reporting and compliance purposes.
All these tools work together to make health and safety management more efficient, transparent, and compliant with building regulations. Each record is securely stored online and can be easily searched, filtered, or exported for audits and safety reviews.

Home > Health & Safety > Fire Alarm Test
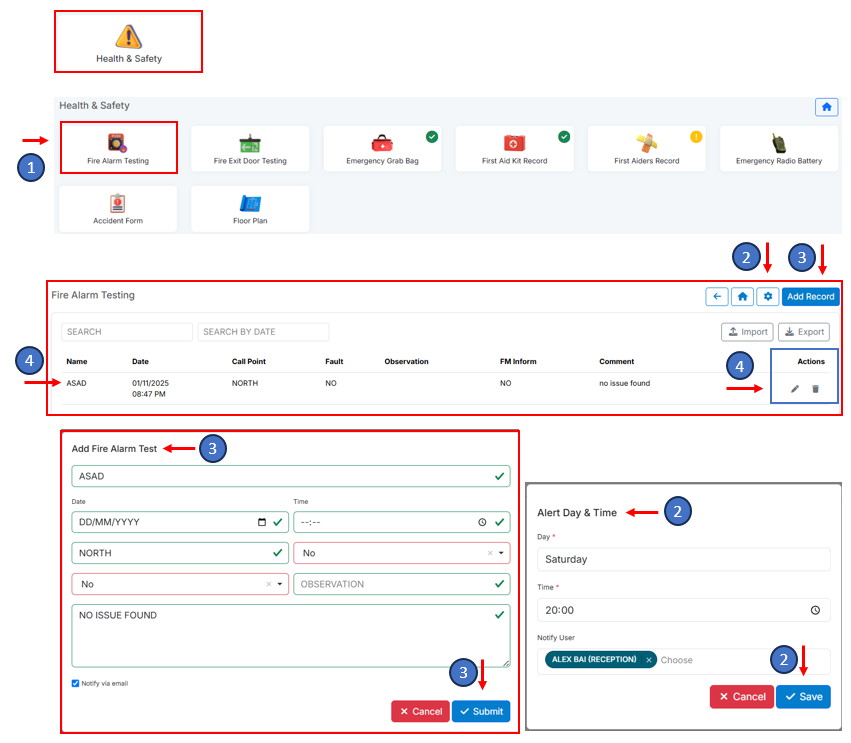
The Fire Alarm Testing feature helps administrators plan, record, and manage routine fire alarm checks to keep safety records organised and up to date.
Step 1: Open the Fire Alarm Testing Section
- From the home menu, click on Health and Safety.
- Select Fire Alarm Testing from the list of options.
- The Fire Alarm Testing window will open, showing any previously recorded tests.
Step 2: Schedule the Next Fire Alarm Test
- In the Fire Alarm Testing window, click on the Settings button located at the top-right corner.
- In the settings form, enter the date and time for the next fire alarm test.
- Click Save to confirm.
- The scheduled test will now appear in the system, helping your team stay aware of upcoming tests.
Step 3: Add a Record After Testing
- Once the fire alarm has been tested, click on the Add Record button next to the Settings option.
- A pop-up form will appear. Fill in the required details such as:
- The date and time of the test
- The name of the person who conducted it
- The result or outcome of the test
- Any additional notes or remarks
- Click Submit to save the record.
Step 4: Manage and Review Records
- The new record will appear in the main Fire Alarm Testing window.
- To make changes, use the Edit option in the Action field.
- You can also use the Search and Filter tools to quickly find specific records by date or keyword.
- Records can be exported for audits or compliance reports and imported back into the system if required.
Home > Health & Safety > Fire Exit Door
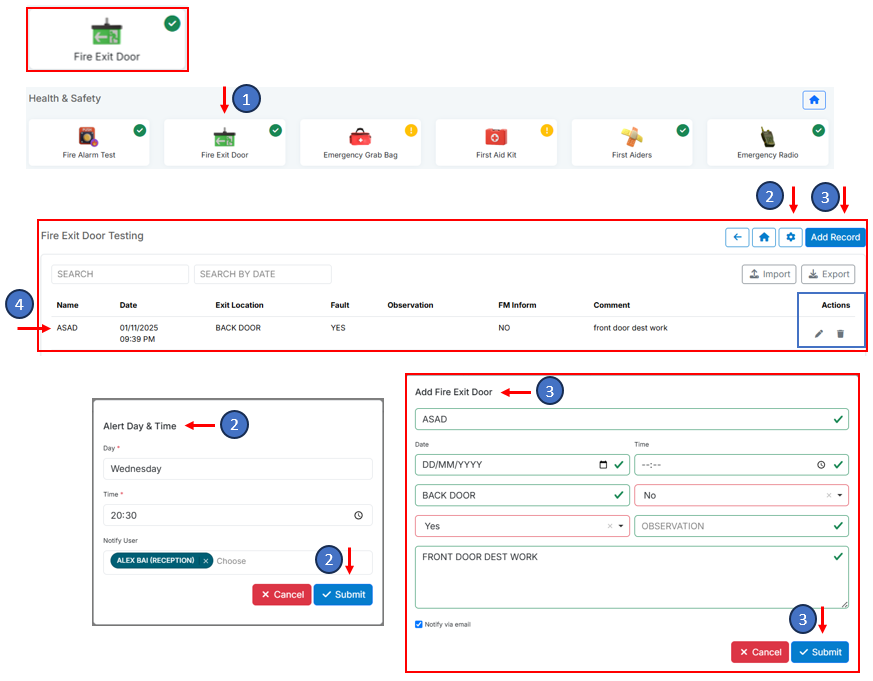
The Fire Exit Door Testing feature allows administrators to schedule, record, and manage regular inspections of all fire exit doors within the building. This helps ensure that each door is safe, fully functional, and compliant with safety regulations.
Step 1: Open the Fire Exit Door Testing Section
- From the home menu, select Health and Safety.
- Click on Fire Exit Door Testing.
- The Fire Exit Door Testing window will open, displaying any previously recorded inspections.
Step 2: Schedule a Fire Exit Door Inspection
- In the Fire Exit Door Testing window, click the Settings button located at the top-right corner.
- Enter the planned inspection date and time in the provided form.
- Click Save to confirm your schedule.
- The scheduled inspection will now appear in the system, making it easy to track upcoming tests.
Step 3: Add a New Inspection Record
- After completing the inspection, click the Add Record button next to the Settings option.
- A pop-up form will appear. Fill in details such as the inspection date, name of the inspector, condition of each door, and any comments or issues found.
- Once all information is entered, click Submit to save the record.
Step 4: Manage and Review Inspection Records
- The new record will now be visible in the main Fire Exit Door Testing window.
- To make changes, use the Edit option available in the Action field.
- Use the Search and Filter tools to find specific records quickly.
- Records can also be exported for audits or compliance purposes and imported into the system when needed.
Home > Health & Safety > Emergency Grab Bag
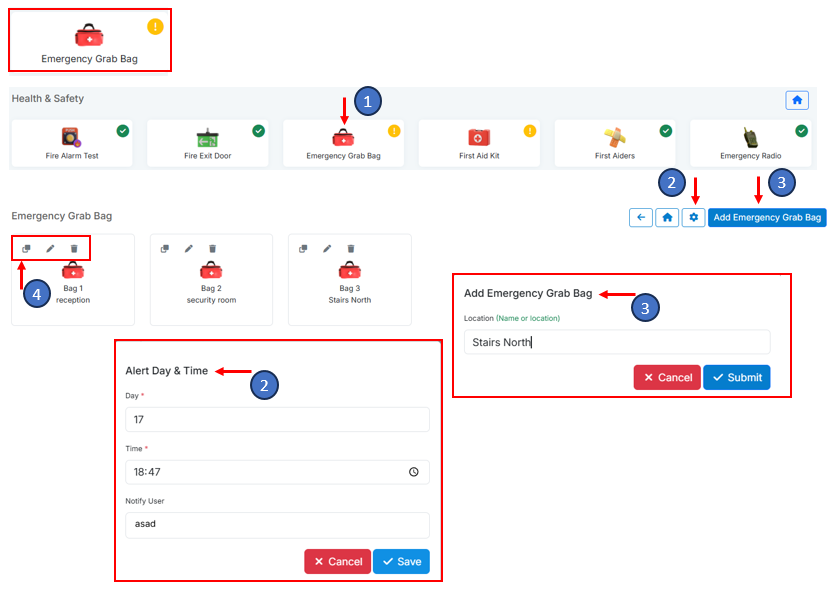
The Emergency Grab Bag feature allows administrators to schedule, create, and manage records of all emergency kits maintained on-site. These records help ensure that essential safety supplies are regularly checked and always ready for use in case of an emergency or evacuation.
Step 1: Open the Emergency Grab Bag Section
- From the home menu, select Health and Safety.
- Click on Emergency Grab Bag from the list.
- The Emergency Grab Bag window will open, showing any previously created grab bags and their details.
Step 2: Schedule an Emergency Bag Check
- In the Emergency Grab Bag window, click on the Settings button located at the top-right corner.
- Set the date and time for the next inspection or check of the emergency grab bags.
- Click Save to confirm.
- The scheduled task will appear in the system, reminding the admin when the next inspection is due.
Step 3: Add a New Emergency Grab Bag
- After scheduling, click on the Add Emergency Grab Bag button.
- A pop-up form will appear where you can enter details such as the bag’s name or ID, location, and person responsible.
- Click Submit to save the new grab bag record.
- Once submitted, the new bag will be added to the list in the main Emergency Grab Bag window.
Step 4: Manage Existing Grab Bags
- Newly added bags will appear in the main Emergency Grab Bag window.
- Each bag record includes management tools that allow the admin to clone, edit, or delete the bag when required.
- Use these options to update information, duplicate similar bags for other locations, or remove outdated records.
- Regularly reviewing and updating grab bag information ensures your emergency kits remain complete and compliant with safety standards.
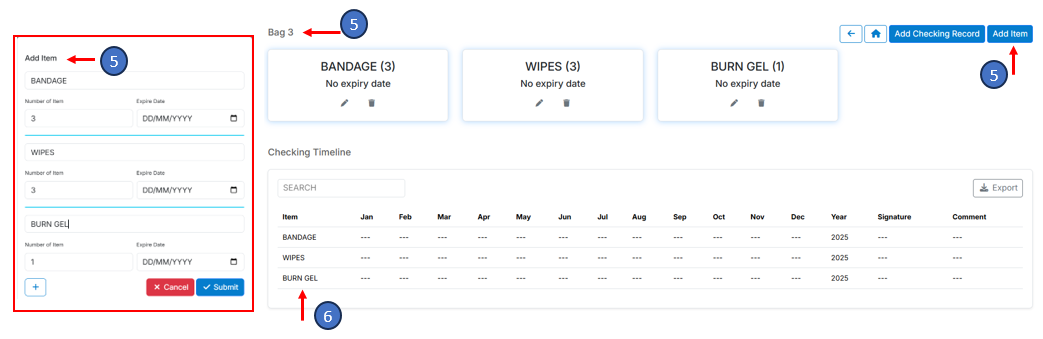
Step 5: Add Items to a Grab Bag
- Once a bag has been created, click on the Add Item button to include items within that bag.
- A pop-up form will open where you can enter details such as the item name, quantity, expiry date (if applicable), and any notes.
- Click Submit to save the item details.
- Repeat this step to add all items included in the emergency grab bag.
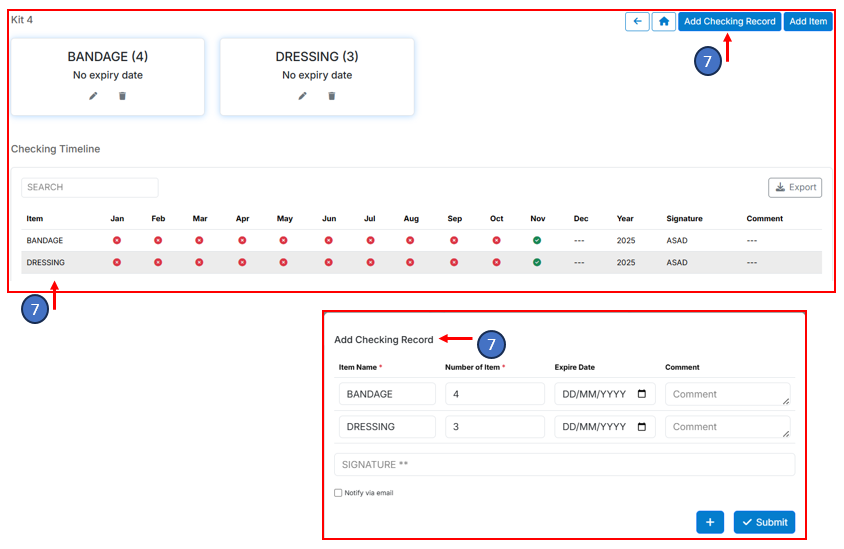
Step 6: Review and Export Item Records
- After submission, all the items added will appear in the Checking Timeline window.
- From here, the admin can view, edit, or verify each item record.
- Use the Search tool to quickly find specific items or inspection dates.
- The Export option allows you to download the record list for audits, reporting, or compliance reviews.
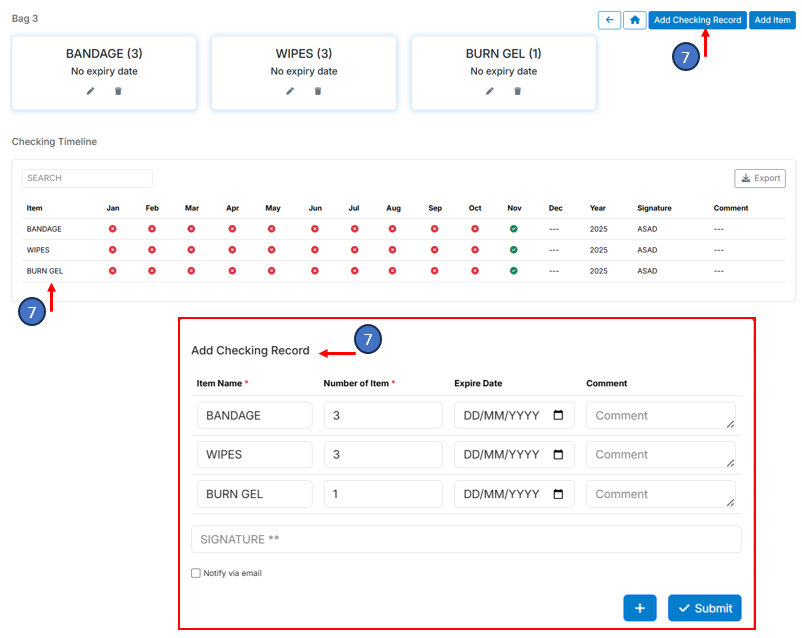
Step 7: Add a Checking Record
- To keep the emergency grab bag records accurate and up to date, click on the Add Checking Record button.
- A pop-up form will appear, allowing the admin to verify the details of the bag and its items during routine checks.
- Review the contents, confirm that all listed items are present and in good condition, and make any necessary notes about replacements or updates.
- Click Submit to save the record.
- A new entry will be added to the Checking Timeline window, showing the date, time, and details of the completed inspection.
Home > Health & Safety > First Aid Kit
The First Aid Kit Record feature allows administrators to manage and monitor the first aid kits placed throughout the building. It helps ensure that all kits are regularly inspected, properly stocked, and compliant with health and safety standards.
Step 1: Open the First Aid Kit Record Section
- From the home menu, select Health and Safety.
- Click on First Aid Kit Record from the list.
- The First Aid Kit Record window will open, showing all existing first aid kit entries within the building.
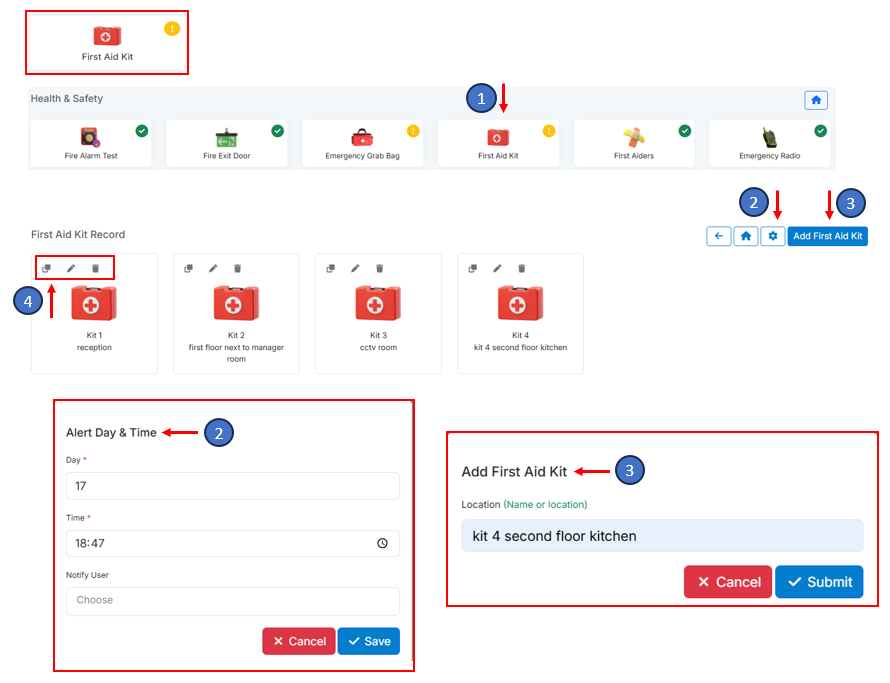
Step 2: Schedule a First Aid Kit Inspection
- In the First Aid Kit Record window, click the Settings button located at the top-right corner.
- Enter the date and time for the next first aid kit inspection.
- Click Save to confirm your schedule.
- The scheduled inspection will now appear in the system, reminding the admin when the next check is due.
Step 3: Add a New First Aid Kit
- After scheduling, click on the Add First Aid Kit button.
- A pop-up form will appear. Enter details such as the kit’s name or ID, its location, and the person responsible for maintaining it.
- Click Submit to save the new first aid kit record.
- The newly created kit will now appear in the main First Aid Kit Record window.
Step 4: Manage Existing First Aid Kits
- Each first aid kit listed in the main window includes management options that allow the admin to clone, edit, or delete the kit as needed.
- These options make it easy to update information, duplicate similar kits across multiple areas, or remove outdated entries.
- Regularly managing and reviewing each record ensures all first aid kits remain accessible, complete, and compliant with building safety standards.
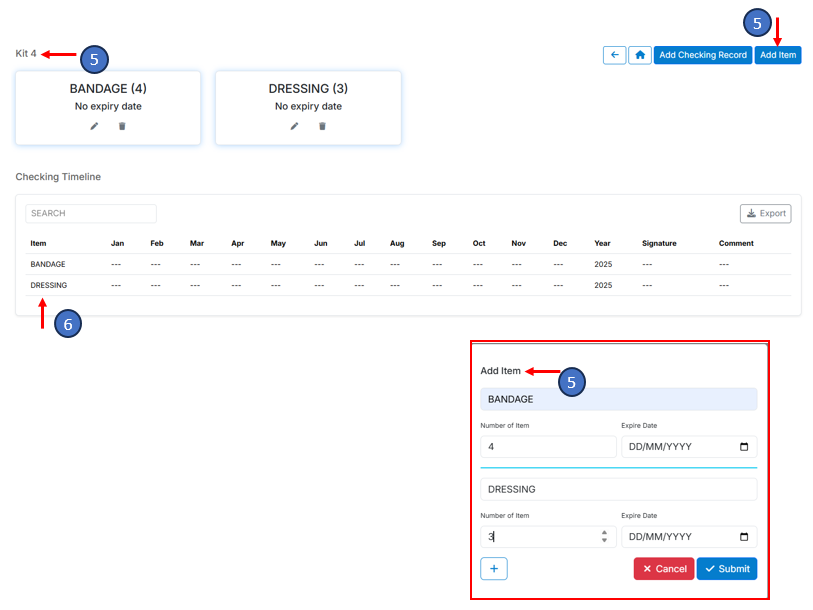
Step 5: Add Items to a First Aid Kit
- Once a first aid kit has been created, click on the Add Item button to record the contents of that kit.
- A pop-up form will appear where the admin can enter details such as the item name, quantity, expiry date (if applicable), and any additional notes.
- After completing the form, click Submit to save the information.
- Repeat this process to add all the essential supplies included in the first aid kit, ensuring a complete and accurate inventory.
Step 6: Review and Export Item Records
- After adding items, they will appear in the Checking Timeline window.
- From this view, the admin can monitor all first aid kit items, review past checks, and verify their current status.
- The Search tool can be used to quickly locate specific items or inspection records.
- The Export option allows records to be downloaded for reporting or compliance purposes, making it easier to maintain transparent health and safety documentation.
Step 7: Add a Checking Record
- To keep the first aid kit records accurate and up to date, click on the Add Checking Record button.
- A pop-up form will appear, allowing the admin to verify the contents of the kit during a routine inspection.
- Review each item to ensure it is present, within its expiry date, and in good condition.
- Make any necessary notes about replaced or restocked items, then click Submit to save the record.
- A new entry will be added to the Checking Timeline window, showing the date, time, and details of the inspection for future reference.
Home > Health & Safety > First Aiders
The First Aiders Record feature allows administrators to keep an up-to-date list of all trained first aiders within the building. This ensures that in case of an emergency, the right people can be contacted quickly and efficiently.
Step 1: Open the First Aiders Section
- From the home menu, click on Health and Safety.
- Select First Aiders from the list.
- The First Aiders window will open, displaying a complete list of all currently registered first aiders.
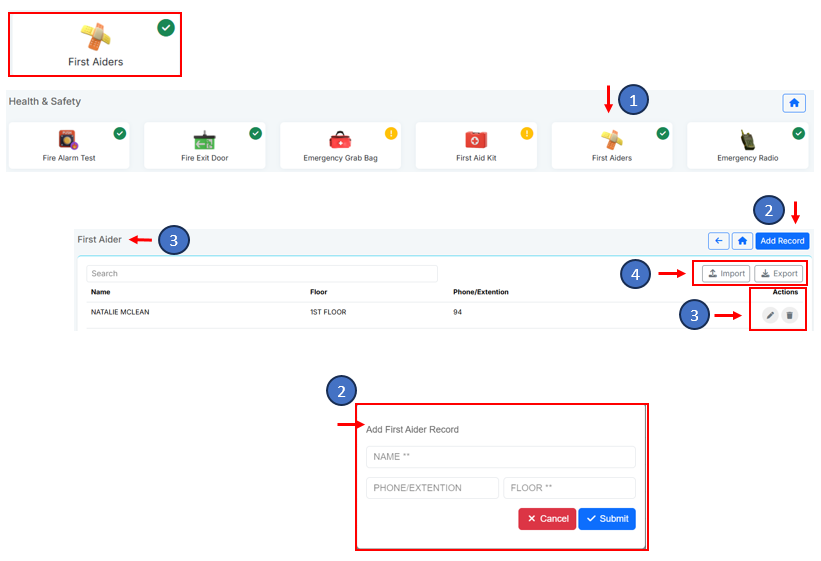
Step 2: Add a New First Aider Record
- In the First Aiders window, click the Add First Aider Record button.
- A pop-up form will appear. Enter the required information, such as the first aider’s name, department, contact number, and certificate expiry date.
- Once all details are entered, click Submit to save the new record.
Step 3: Manage Existing Records
- All registered first aiders are listed in the main First Aiders window.
- To make changes, use the options available in the Actions field to edit or delete any existing record.
- Ensure that all information remains current, especially contact details and certificate validity.
Step 4: Export or Import Records
- Use the Export option to download a copy of the first aiders list, which can be printed or shared with your team for emergency readiness.
- The Import option allows you to upload or update first aider information from an external file when needed.
- Regularly exporting and updating this data ensures your records are accurate and accessible at all times.
Home > Health & Safety > Emergency Radio Battery
The Emergency Radio Battery feature allows administrators to schedule and record regular checks of emergency radios to ensure they are fully charged and ready for use during emergencies. Keeping accurate records of these checks helps maintain communication reliability across the site.
Step 1: Open the Emergency Radio Battery Section
- From the home menu, select Health and Safety.
- Click on Emergency Radio Battery from the list.
- The Emergency Radio Battery window will open, showing any existing records of radio checks.
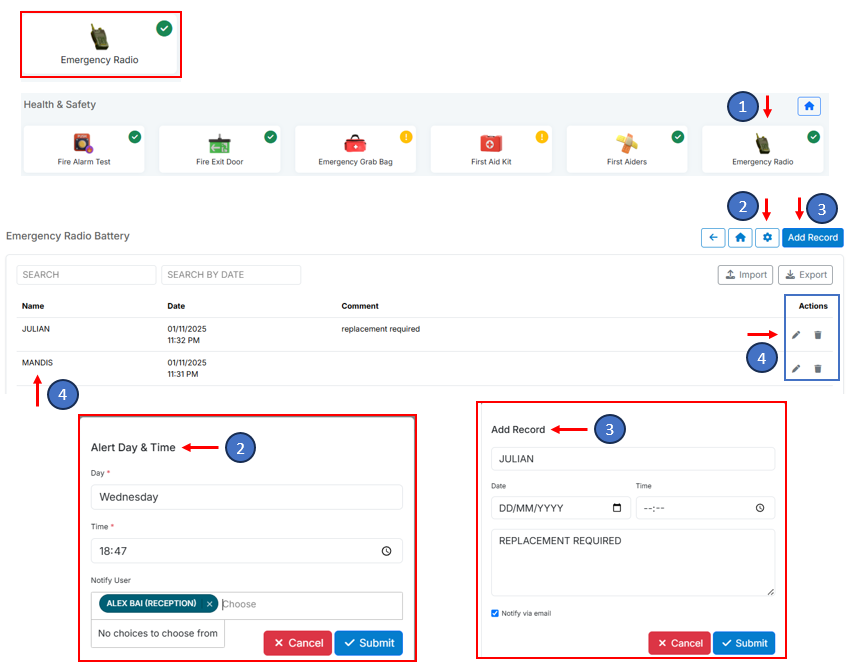
Step 2: Schedule a Radio Battery Check
- In the Emergency Radio Battery window, click on the Settings button located at the top-right corner.
- Enter the date and time for the next battery inspection or charging check.
- Click Save to confirm.
- The scheduled task will now appear in the system, ensuring that regular checks are carried out on time.
Step 3: Add a New Battery Check Record
- After completing a battery check, click on the Add Record button next to the Settings option.
- A pop-up form will appear where you can enter details such as the radio ID or location, battery level, condition, and any remarks.
- Once all information has been entered, click Submit to save the record.
- The new record will be added to the list in the main Emergency Radio Battery window.
Step 4: Manage and Review Records
- All saved records can be viewed in the main Emergency Radio Battery window.
- Use the options in the Action field to edit or delete existing entries as needed.
- The Search and Filter tools can help locate specific records quickly.
- You can also export the data for audit or compliance reporting and import it back into the system when required.
Home > Health & Safety > Floor Plan
Function & Purpose
This tool empowers users to prepare for emergency scenarios by creating a centralized, visual reference map paired with critical contact information — ensuring rapid response, coordination, and clarity during fire, medical, or security incidents.
| Capability | Description |
|---|---|
| Emergency Contact Assignment | Users can assign up to four key contacts to each floor — typically security staff, fire marshals, or floor managers to be reached during emergencies |
| Floor Plan Map Upload | Users can upload a physical layout or schematic of the floor directly into the system — useful for emergency teams navigating tight or complex spaces |
| Location Aid for First Responders | Uploaded maps help fire brigade, paramedics, or internal security personnel to identify rooms, access points, stairwells, exits, and hazard zones with precision |
| Editable & Update-Friendly | Both contacts and maps are fully editable — allowing users to update the emergency team and layouts as the building evolves |

Navigate to Health & Safety Suite
- Go to the main menu and select "Health & Safety".
- Open the Floor Plan Feature
- Click on "Floor Plan" from the available options.
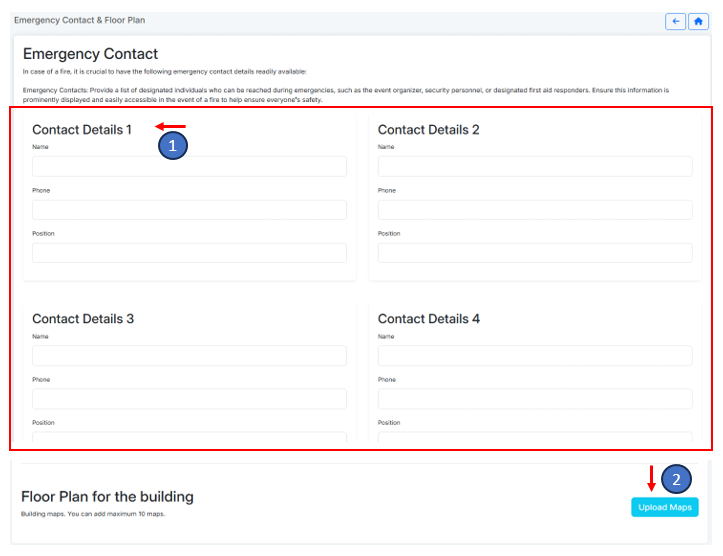
1. Add Emergency Contacts
- You can enter up to four contact details of people responsible during emergencies (e.g. fire marshal, security lead, floor manager, medical responder).
-
For each contact, provide:
- Full Name
- Phone Number
- Role/Responsibility
2. Upload a Floor Map
- Scroll to the bottom of the form and click "Upload Floor Plan Map"
- Attach a clear image or PDF of the floor layout
- This map will help fire brigade or emergency staff navigate efficiently
Save Your Floor Plan Profile
- After entering contacts and uploading the map, click "Save & Submit"
- Your floor plan will be stored and accessible during emergency situations
Important Notes
- Make sure contacts are updated regularly — especially when staffing changes occur
- Upload accurate and labeled maps that clearly show exits, stairwells, and equipment
- These floor plans may be used during webapp downtime, emergencies, or drills
Home > Health & Safety > Accident Form
Accident Form Feature — Incident Reporting Made Seamless
Purpose
Enable employees and office personnel to quickly and securely document any accidents or incidents that occur within the workplace — ensuring proper record-keeping, accountability, and insurance eligibility.
How It Works
Form Access
- Admins or reception staff send the Accident Form to the affected employee via email link
- The link opens the form in a secure web interface, accessible from desktop or mobile
Form Details & Fields
Employee fills in critical fields such as:
- Name of affected person, Date, time, and location of the incident, Description of what happened, Names of any witnesses, Severity level and any medical response taken, Supporting notes or initial observations, Attachments: photos, documents, doctor notes, etc.
Submit & Record
- Once submitted, the form is stored in the system’s Accident Record Log for review by HR, admin, or safety personnel
- Employees may receive a confirmation email for their records
Why It Matters
- Compliance & Traceability: Keeps your workplace aligned with regulatory standards and internal safety protocols
- Insurance Claims Support: Submitted forms act as evidence for workplace insurance or injury claims
- Centralized Recordkeeping: Builds an auditable database of all past incidents, linked to floor plans and emergency response file

Home > Messages
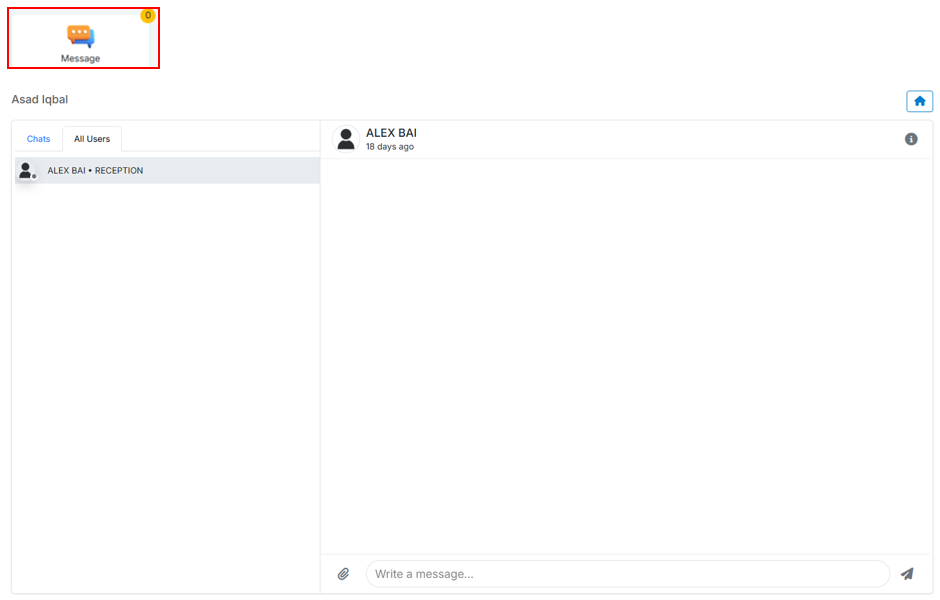
The Messaging feature allows users to communicate quickly and efficiently within the organisation. It provides a simple way for team members to share updates, respond to queries, and coordinate daily tasks — all from within the FrontDeskVisitor platform.
Home > User/Employee
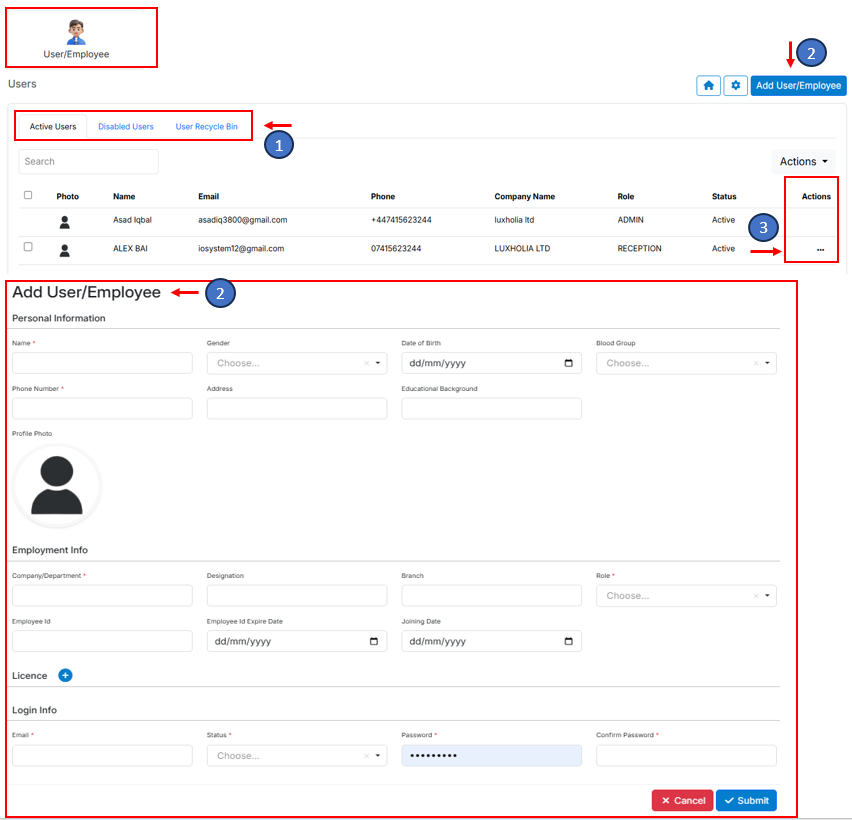
The User / Employee Management feature allows administrators to create, manage, and assign roles and permissions to staff members using the system. It helps maintain organised user records and ensures that each team member has the correct level of access to perform their duties.
Step 1: Open the User / Employee Section
- From the home menu, select User / Employee.
- The User / Employee window will open, displaying all existing users in three categories — Active Users, Disabled Users, and Recycle Bin (for deleted records).
- This overview helps the admin monitor user status and manage accounts efficiently.
Step 2: Add a New User or Employee
- On the right-hand side of the window, click the Add User / Employee button.
- A pop-up form will appear where you can enter all the required details, including the user’s name, email address, role, and department.
- Once completed, click Submit to create the new user account.
- The new user will now be added to the system and displayed in the main User / Employee window.
Step 3: Manage Existing Users
- All active and disabled users are listed in the main User / Employee window.
- Use the Action field to edit or update user details as needed.
- This includes updating contact information, changing roles, or reactivating disabled users when appropriate.
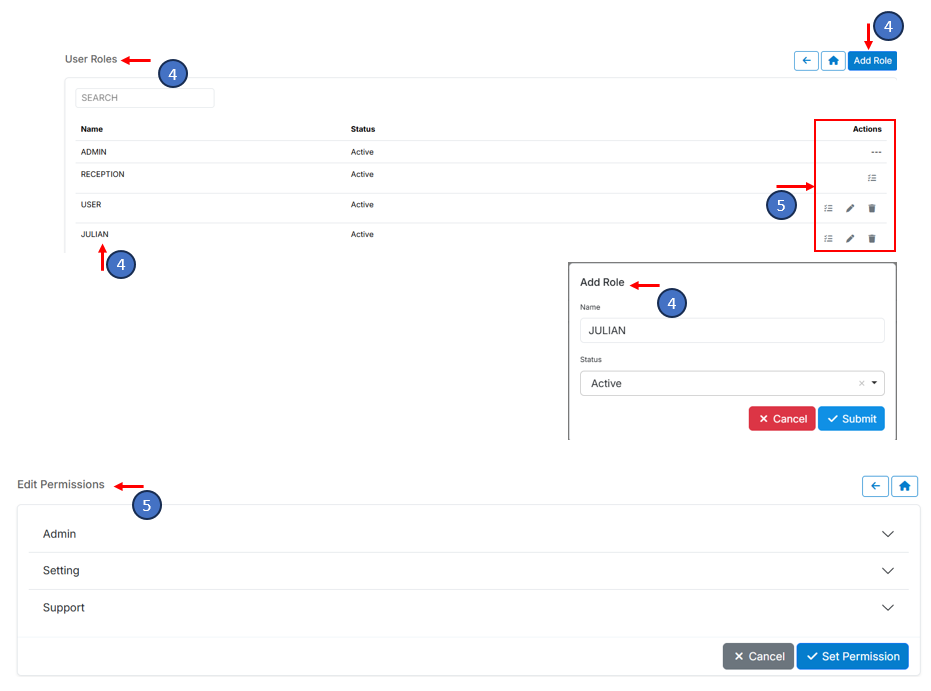
Step 4: Create a New Role
- Click the Settings button located at the top-right corner of the User / Employee window.
- In the settings panel, click on Add Role and fill in the details such as role name and description.
- Click Submit to save.
- The new role will now appear in the list of available roles for assignment.
Step 5: Assign and Manage Permissions
- Each role includes permission settings that determine what users can access or modify within the system.
- To adjust permissions, go to the Action field next to a user or role and select Permissions.
- Carefully review and set permissions according to each employee’s responsibilities.
Note: Please note that FrontDeskVisitor is not responsible for any issues caused by incorrect permission settings — the admin is solely responsible for assigning appropriate access levels to each user.
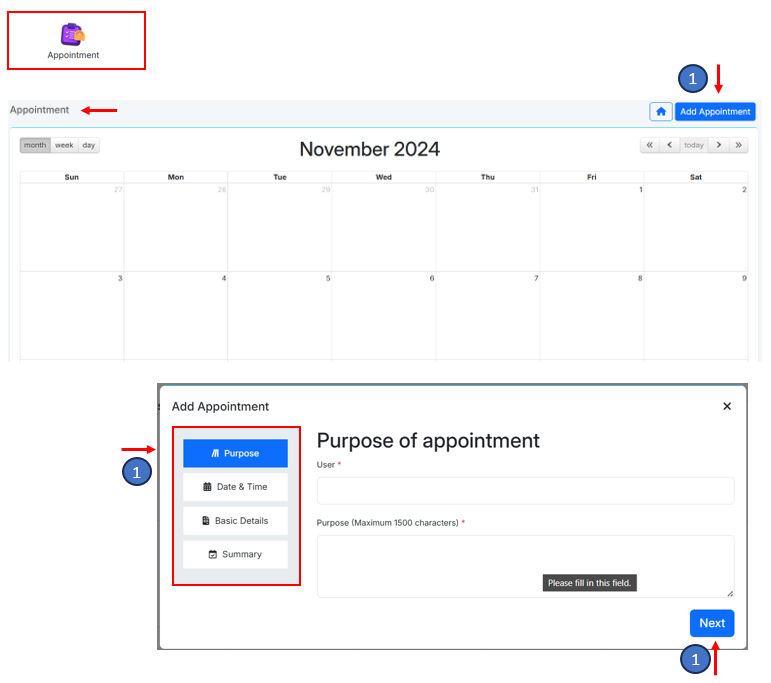
Home > Appointment
- This feature allows users to set appointments among users. To start the process users need to select the "Add Appointment" button and fill in the all the relevant details in the Add Appointment window and submit.
- After form submission, a new appointment will be displayed on the appointment calendar.
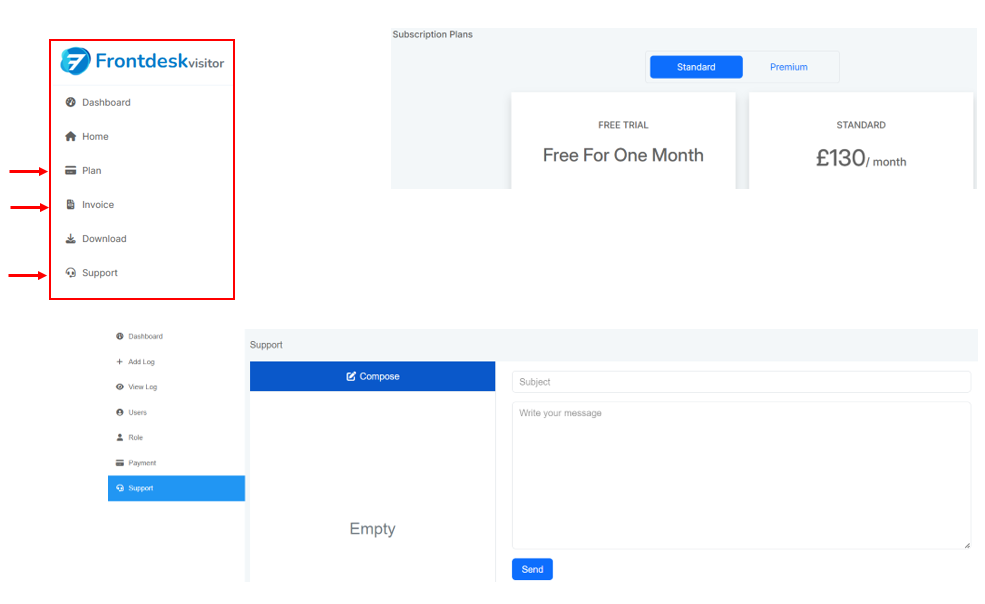
Plan & Invoice
- After joining, users can choose their subscription plans to use our services.
- All the invoices will be available to view and download in the Invoice menu.
Support
For any inquiries or issues encountered while utilizing our services, users are encouraged to reach out to us via the "Support" option. Rest assured; we will respond to your query as promptly as possible.
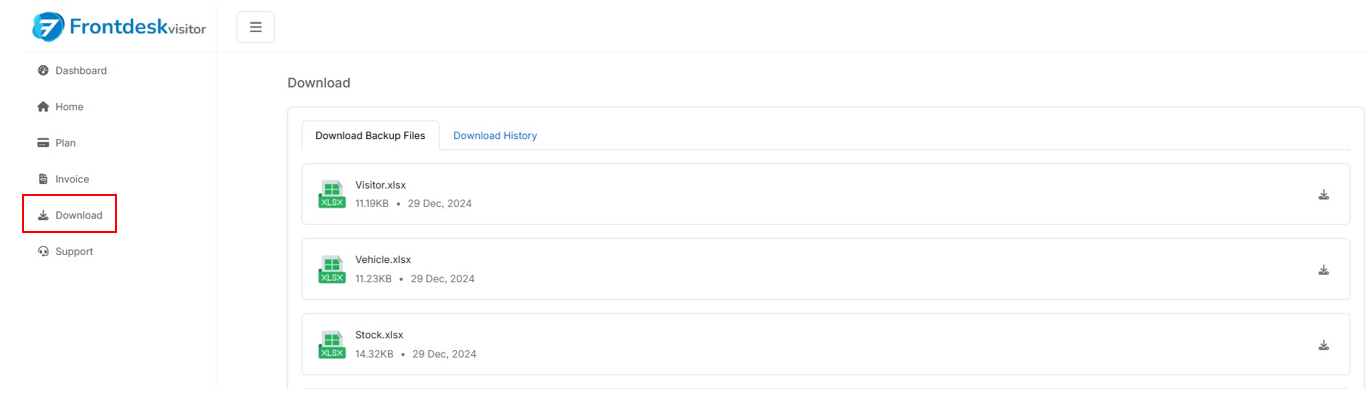
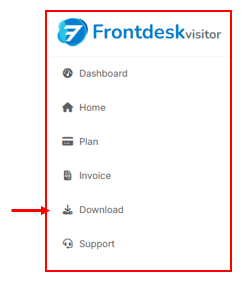
Download
Download is an offline Files Feature in FrontDeskVisitor
Purpose & Context
This functionality provides essential downloadable resources to help users maintain physical or offline records of operational activities especially during events like:
- Power outages, Internet/network failures, Web app downtime or maintenance
By empowering users to work offline and later sync data back to the system, it ensures zero interruption in security, access control, or visitor logs.
Operational Highlights
- Mandatory First Step: All users must download and store these files during initial setup. This ensures readiness from Day 1.
- Compliance & Audit Safety: Files help maintain compliance during downtimes valuable for regulated environments like finance, executive floors, or healthcare setups.
Key Components of the Offline File Suite
| File Type | Purpose | Example Actions |
|---|---|---|
| Visitor Log Sheet | Manual entry of check-ins/check-outs and visitor info | Record visitor names, arrival times, host details |
| Key Issue Tracker | Track issued keys, return status, and recipient signature | Handwritten issuance and return logs for each key |
| Cab booking | Maintain records of booked/scheduled transport | Document pickup/drop details, driver contacts |
| Flight booking Record | Track VIP travel plans when system access is down | Save flight info, gate passes, contact numbers |
| Health & Security Form | Physical record of health declarations, security clearance, and incident reports | Emergency briefing checklists, visitor health status |
Account LogIn
To access their user account, individuals are required to provide their login credentials, including their email address and password.
Understanding Account Interface
Welcome to the home screen, offering users seamless navigation to diverse options and features.
The interface comprises three primary components:
- At the top, a menu provides access to five distinct sections.
- Positioned on the right side, the side menu section offers additional navigation options.
- In the middle, individual pages of specific sections are displayed, facilitating efficient management and access to pertinent information.
My Account
User Profile Management
The User Profile section allows reception users to view, edit, and update their personal and company details on FrontDesk.
Key Features
- Edit Personal Details: Update name, email, phone number, and company name.
- Upload Company Logo: Click the upload icon to change the company logo.
- Update Address: Modify the registered address as needed.
- Save Changes: Click "Update Profile" to apply updates.
Exploring Features in the Top Menu
Home Menu Add Visitor
- Select the "Add Visitor" button on the "Home" page to commence the visitor registration process.
- Enter the visitor’s particulars into the popup menu, ensuring to fill mandatory fields including "Name," "Host," "Reason for Visit," as well as "Date" and "Time." The system conveniently offers automatic date and time inputs, or users can manually input the required details. Upon completing the form, click "Submit" to proceed with the registration.
- After submitting the visitor details, click on the "Print" button to generate a pass for the visitor.
- After submitting the visitor’s details, the new record will promptly appear on the Home screen
- Users can easily modify visitor information by accessing the "Edit" function within the Actions field, followed by confirming the changes using the "Submit" button.
- Adding supplementary notes is straightforward—simply click on the "note icon" located in the Actions field and proceed to submit the entry.
- Reprinting visitor passes is a seamless process with the dedicated print icon conveniently situated within the Actions field.
- For visitor check-out, users have the option to select either the "Check Out" button or the "All Received & Check Out" option available in the Actions field, ensuring efficient management of visitor departures.
- To view the visitors’ history, click on the "Visitor History" button located next to the "Add Visitor" button at the top right side.
- Upon accessing the visitor history window, users will have access to a comprehensive log of all visitor interactions. Utilizing the search options, users can efficiently filter and locate specific records as needed.
- The "Export" button is conveniently provided to enable users to export the desired visitor history data, facilitating easy downloading and printing for record-keeping purposes.
- Manage Visitor: View, search, and control visitor records. Toggle the visitor’s status (Active/Inactive) or delete entries as needed.
- Lost Passes: Track lost visitor passes, including visitor details, host, company, check-in/out times, and pass ID.
- Add Visitor Expire Time: Set how long visitor records remain active before they expire (e.g., in hours or months).
- Add History Deletion Time: Define when old visitor history should be automatically deleted for record management.
Pre Booking
- The user also has the option to pre-book a guest from the "Pre Booking" page.
- Access the "Add Pre Booking" button located at the top right corner of the interface to initiate the pre-booking process. Upon selection, the corresponding form will be displayed on the screen, ready for data input.
- After submitting the pre-booking form, a new record seamlessly integrates into the pre-booking page, instantly visible for reference. Additionally, a counter updates to reflect the number of pre-booked guests.
- For editing pre-bookings, users can click on the "Edit" button in the "Actions" field, make the requisite modifications, and then confirm the changes by clicking the "Update" button.
-
To check-in pre-booked guests:
- When the guest arrives, simply click on the "Check-In" button, relocating the respective record from the pre-booking page to the Home page.
- To remove a pre-booking, users can click on the "Delete" button, effectively canceling the pre-booked reservation.
Contact Details
The Contact Details feature helps manage staff and visitor contact records efficiently.
- Viewing & Searching Contacts: Use the search bar to quickly find a contact. The list displays names, company/department, office details, phone, email, and emergency contact.
- Editing or Deleting a Contact: Click the pencil icon to edit contact details. Click the trash icon to delete a contact from the list.
- Adding a New Contact: Click "Add Contact Details" (top-right). Enter the required details such as name, office, phone, and email. Optionally, upload a profile picture. Click "Submit" to save or "Cancel" to discard changes.
-
Importing & Exporting Contacts:
- Import: Upload multiple contacts at once.
- Export: Download the contact list for records.
Keys
-
Issuing Keys:
-
Users have the option to issue keys in two ways:
- Scan the barcode on the keys using a scanner.
- Manually issue keys by clicking on the "Issue Key" button, entering the necessary details, and clicking on the "Submit" button.
- Upon issuance, a record for the issued key will be added to the home window of the "Keys Timeline".
-
-
Receiving Keys:
- When receiving a key, users are required to select the corresponding key and specify the date and time of receipt before clicking on the "Receive" button in the "Action" field.
-
Action field:
- In the Action field, users are provided with the convenient options to either "Edit" or "Delete" key records.
- Users can effortlessly compile a detailed history of keys through the intuitive "History" feature, facilitating seamless downloading and printing of the data in Excel format.
- The search functionality empowers users to refine their queries for specific keys, leveraging predefined criteria such as "name," "date," or "key number" to streamline their search process.
Notes
Notes are akin to delicate whispers captured on paper, fluttering like delicate petals in the gentle breeze of memory.
- Access the realm of notes by selecting "Notes," unveiling a window where users can peruse notes contributed by various individuals.
- Initiate the creation of fresh notes with a simple click on the "Add Note" button. Interact with the "Add Note" window, diligently providing essential details including Title, Description, and other relevant options before finalizing the process by clicking on the "Submit" button.
- After submission, the newly created note seamlessly integrates into the "Note" page window. Users retain the flexibility to "Edit" or "Delete" these Notes as necessary.
Task
- Open the "Task" Section from the more options menu at the top Navigate to the "Daily Task Activity" section on the system. Click "Add Task" to start entering a new task.
-
Enter Shift Details
- Check-in Date & Time: Select the date and time when the shift begins.
- Check-out Date & Time: Set the date and time for the shift’s end.
- Shift Period: Choose Day or Night based on the shift type.
- Complete the Checklist The checklist ensures that routine tasks are verified. For each task listed, select "Yes" or "No" to confirm if the task was completed.
-
Assign Key Personnel for the Shift
- Role: Enter the job title of the person responsible for the shift.
- Name: Type the person’s name.
- Handover To: Specify the individual responsible for the next shift.
- Description: Add any additional details about the shift handover.
-
Actions Required for the Next Shift
- Description: Enter any tasks or issues that need to be addressed in the next shift.
- Required By: Set the deadline for the task completion.
- Person Responsible: Assign the individual responsible for the task.
-
Maintenance Summary
If maintenance work was done during the shift, document it:
- Work Type: Select the category of work (e.g., electrical, plumbing, cleaning).
- Description: Briefly explain what was done.
- Photos of Work: Upload images as proof of work.
- Comments: Add additional remarks related to the maintenance activity.
-
Workforce Hours
For workforce tracking, enter:
- Name: The name of the worker.
- Trade: The type of work or role they performed.
- Hours: The number of hours worked.
-
Task Summary
- Task: Select the type of task completed.
- Time: Specify the time when the task was performed.
- Description: Provide a short explanation of the task.
- Action: Mention any follow-up actions required.
- Add Notes Use the rich-text editor to add any extra notes, reports, or feedback related to the shift.
-
Sign & Save
- Signature: Type your name or initials to confirm the task entry.
Click "Save" to submit the activity log.
- Upon clicking on any Activity within the calendar, users are presented with a form containing relevant details they provided on the "Add Task" form.
- Within this form, users are afforded various options including printing, editing, deleting, or closing the activity as needed.
Note: If users need to perform any actions on the rows, they can use the three-dot button and the "+" button to delete, move up or down, or add a new row.
In Stock
The Stock Out feature allows reception users to record and ensures accurate stock management and keeps a log of stock usage. Below is a step-by-step guide on how to use this feature.
- Accessing Stock Out Click "Stock Out" in the top-right corner. A form will appear to enter stock details.
-
Enter Stock Out Details
- Date & Time: Select when the stock is removed.
- Select Stock Item: Choose the item from the dropdown.
- Reason for Stock Out: Provide a valid reason (e.g., used, transferred, damaged).
- Notes (Optional): Add extra details if needed.
- Submitting the Entry Your name will auto-fill in the Stocked Out By field. Click "Submit" to save or "Cancel" to discard.
-
Managing Stock Out Records
View submitted entries in the Stock List. Use the search bar to find records. In Actions, you can:
- View
- Edit
- Delete
-
Using the "Stock In" Feature
The Stock In feature allows reception users to record new stock items added to the inventory. Follow these steps:
- Accessing Stock In Click on the "Stock In" option. A form will appear to enter stock details.
-
- Date & Time: Select when the stock is added.
- Checklist: Mark "Yes" or "No" for listed stock items to confirm their arrival.
- Stock Items: Add stock by selecting items (e.g., Poly Rolls, Hangers, etc.).
- Notes (Optional): Use this section to add any additional details.
- Submitting the Entry Your name will auto-fill in the Stocked In By field. Click "Submit" to save or "Cancel" to discard.
-
Stock History in the "Stock In" Option
The Stock History feature tracks all stock movements, including added, removed, damaged, or lost items.
-
Key Features:
- Stock Records: Displays item details, movement dates, reasons, and user signatures.
- Check In/Out: Logs stock added or removed, including item status (normal, damaged, or lost).
-
Search & Filters:
- Search Bar: Quickly find stock entries.
- Filters: View all stock, damaged, or lost items.
- Export Data: Download stock records for tracking.
- Action Button: May restrict edits or provide stock management options.
-
Key Features:
Flight Booking
Flight Booking Feature
The Flight Booking feature allows reception users to schedule, manage, and track flight reservations.
-
Viewing & Searching Bookings
Use the search bar to find bookings by name or date.
The list displays booking details, including passenger name, department, flight number, departure, destination, price, and status.
-
Adding a Flight Booking
- Click "Add Flight Booking" (top-right).
- Enter required details:
- Passenger name, phone, department.
- Flight details (ticket number, departure, destination).
- Booking and required flight date/time.
- Price and additional comments.
- Click "Submit" to save or "Cancel" to discard.
-
Importing & Exporting Data
- Import: Upload multiple bookings at once.
- Export: Download flight records for tracking.
User/Employee
Add User/Employee Feature
The Add User/Employee feature allows reception users to register and manage employee profiles efficiently.
-
Viewing & Managing Users
Use the search bar to find employees.
The list displays user details, including name, email, phone, company, role, and status.
Actions:
- Edit (pencil icon) – Update user details.
- View (eye icon) – Check user profile.
- Delete (trash icon) – Remove a user.
-
Adding a New User/Employee
- Click "Add User/Employee" (top-right).
- Fill in required details:
- Personal Info: Name, gender, phone, address, etc.
- Employment Info: Department, role, designation, joining date.
- Login Info: Email, status, and password setup.
- Click "Submit" to save or "Cancel" to discard.
Accident
Accident/Incident Reporting
The Accident/Incident Form allows reception users to log workplace accidents with critical details.
-
Recording an Accident
Click "Add Accident/Incident" to open the form.
Fill in required details:
- Personal Info: Name, site/contract, home address.
- Accident Details: Date, time, location, body part affected, nature of injury.
- Description: Provide a full account of the incident.
- First Aid & Hospital Visit: Confirm if medical assistance was provided.
- Witnesses & Reporting: Log witness names and first person informed.
-
Additional Information
- Work Hours: Enter shift details on the accident day.
- Signature & Date: Finalize the report with a digital signature. Click "Submit" to save or "Cancel" to discard.
Appointment
Appointment Feature
The Appointment Feature allows reception users to schedule and manage appointments using a step-by-step process.
-
Accessing the Appointment Calendar
View scheduled appointments in month, week, or day format.
Click "Add Appointment" to schedule a new appointment.
-
Step-by-Step Appointment Booking
- Purpose: Enter the user’s name and the reason for the appointment.
- Date & Time: Select the appointment date and preferred time.
- Basic Details: Provide additional information like location or meeting specifics.
- Summary: Review all details before submission.
-
Submission & Calendar Update
Once submitted, the appointment appears on the calendar for tracking.
Users can edit or manage appointments as needed.
Files
The Files Feature allows reception users to access and download important records in Excel format.
- Key Functions:
- Displays a list of downloadable files related to visitors, vehicles, stock, cab bookings, and deliveries etc.
- Each file shows its name, size, date of upload, and a download button.
- Click the download icon to save the file to your device.
Vehicles
- To access available vehicles and their timelines, users should click the "Vehicles" button in the side menu.
-
Vehicle Checking Out
To wrap up a vehicle checkout, users are prompted to choose the "Vehicle Checkout" button. Users will enter all necessary checkout details within the popup window before confirming with the "Submit" button. A fresh checkout record will appear in the "Vehicle Timeline" window.
-
Vehicle Checking In
To check in vehicles, users should click on the "Check In" button found in the "Action" field within the "Vehicle Timeline" section.
- Users must enter accurate details in the provided popup window before submitting the "Vehicle Check-in" form.
- To view the vehicle’s checkout history, simply click on the "History" button. This action triggers a new window to open, revealing the comprehensive history of the vehicle.
- Users have the option to export this history for printing by using the "Export" feature. Additionally, they can employ various search filters to refine results and find the most relevant record.
Health & Safety > Fire Alarm Test
- Within the "Health & Safety" section, users are given six distinct categories, each serving a unique purpose.
- To access the Fire Alarm Test records, navigate to the "Fire Alarm Test" button within the "Health & Safety" section. This action will open a new window showcasing the existing Fire Alarm Test records.
- To initiate a new Fire Alarm Test entry, users simply click the "Add Record" button and input all required information. Subsequently, a new record seamlessly integrates into the page.
Note: Users have the option to either select "Call Points" from the drop-down menu or add a new "Call Point".
Health & Safety > Fire Exit Door
- This menu displays records of the Fire Exit Doors in the building.
- To add a new record, click on the "Add Record" button and fill in all the mandatory fields before submitting. A new record will be displayed in the "Fire Exit Door" window.
- Utilize the Export button to save and download the "Fire Exit Door" records in an Excel file for printing. The Import option enables users to upload records from their desktops.
Health & Safety > Emergency Grab Bags
- To access information and records for Emergency Grab Bags, click on the "Emergency Grab Bag" button, and its corresponding page will be opened.
- To add new Emergency Grab Bag information, click on the "Add Emergency Grab Bag" button. In the popup menu, input its location and click the "Submit" button. This action will add a new record.
- All records of Emergency Grab Bag’s locations within the building will be displayed in this window.
- Use the options provided on each bag to "Clone"," Edit" or "Delete" any bag from the record.
- Choose any Bag to open its information window. Here, you’ll find a list of items already included.
- To add a new item, select the "Add Item" button. Complete the necessary details in the popup menu and confirm by clicking "Submit". This action will append a new item to the Grab Bag.
- For any modifications or deletions to existing items, utilize the corresponding options provided alongside each bag entry.
Health & Safety > Emergency Garb Bags > Item Checking Records
- Begin by clicking on the "Add Checking Record" button to initiate the process.
- Within the popup menu, input the checking date along with any other pertinent details before proceeding to click the "Submit" button.
- Access the comprehensive history of all checked items, utilizing the scroll bar to navigate through the list effectively.
- To facilitate convenient record-keeping, utilize the export button to generate an Excel sheet containing the checking history, enabling seamless printing.
- Add additional records by clicking on the "+" button as needed.
- Similarly, remove unwanted items by selecting the "-" button for deletion.
Health & Safety > First Aid Kit
- Begin by clicking on the "First Aid Kit" button to access the records associated with it. This action will prompt the opening of the First Aid Kit window, where all relevant records are displayed.
- Users are empowered with the capability to manage these records efficiently, with options to edit or delete them using the designated "Edit" or "Delete" buttons.
- Keep an eye out for the "green check" sign, indicating that the items within the kit have undergone verification.
Conversely, the presence of the "yellow" sign suggests that certain items within the kit are yet to undergo the verification process. - Initiating a new record for a first aid kit is effortless. Click on the "Add First Aid Kit" button, proceed to fill out the form diligently, and upon completion, click "Submit". This action seamlessly adds a new record to the repository.
- Enhance the kit’s inventory by incorporating new items through the "Add Item" button.
- Manage items within specific kits, such as Kit1, with options to edit or delete individual items.
- Seamlessly include checking records by utilizing the "Add Checking Record" button.
- Provide the necessary details for the checking record and submit the form accordingly.
- Upon submission, a new record will be appended, accessible by scrolling down within the "Checking Timeline" using the scroll bar.
- Users have the option to export these records into an Excel ".csv" file for convenient printing.
Health & Safety > First Aiders
- Navigate to the "First Aiders" section to access information regarding first aiders. Upon clicking the designated button, the First Aider window will appear, presenting a comprehensive list of all recorded first aiders.
- To include new entries, select the "Add First Aider Record" button within the First Aider window.
- Complete the required fields in the subsequent popup form and confirm by clicking the "Submit" button.
- View and manage records of all registered first aiders within the building directly within the First Aider window.
- Utilize the provided buttons for editing or deleting any existing record as necessary.
- Additionally, leverage the Export and Import functionalities to print out or upload first aider’s information, ensuring readiness for emergencies.
Health & Safety > Emergency Radio
- Navigate to the Emergency Radio section by selecting the "Emergency Radio" button. This will open the Emergency Radio window, where all pertinent records are displayed.
- To add details for a new record, click on the "Add Record" button. Fill in the necessary information in the popup menu, then click "Submit" to save the entry.
- Upon submission, the new record will be seamlessly integrated into the Emergency Radio window. Users can then edit or delete entries as needed using the options provided in the "Action" field.
- Users have the flexibility to export or import Emergency Radio data, allowing for easy printing or uploading from external files for efficient management of emergency communication resources.
Health & Safety > Fire Alert
- In the event of a fire emergency, users should access the fire alert form by clicking on the "Fire Alert" button. Within this form, users will have access to all visitor details currently present in the building, facilitating their contact and evacuation in the event of a fire emergency.